Lighting a Whiskey Bottle and Glass Using Multiple Flashes
April 24, 2020Food Photography
Last week — I wrote a small article on lighting a stack of donut sticks with four flashes, which included several diagrams of the setup. This week, I'm taking a look at a Jack Daniel's whiskey bottle and glass.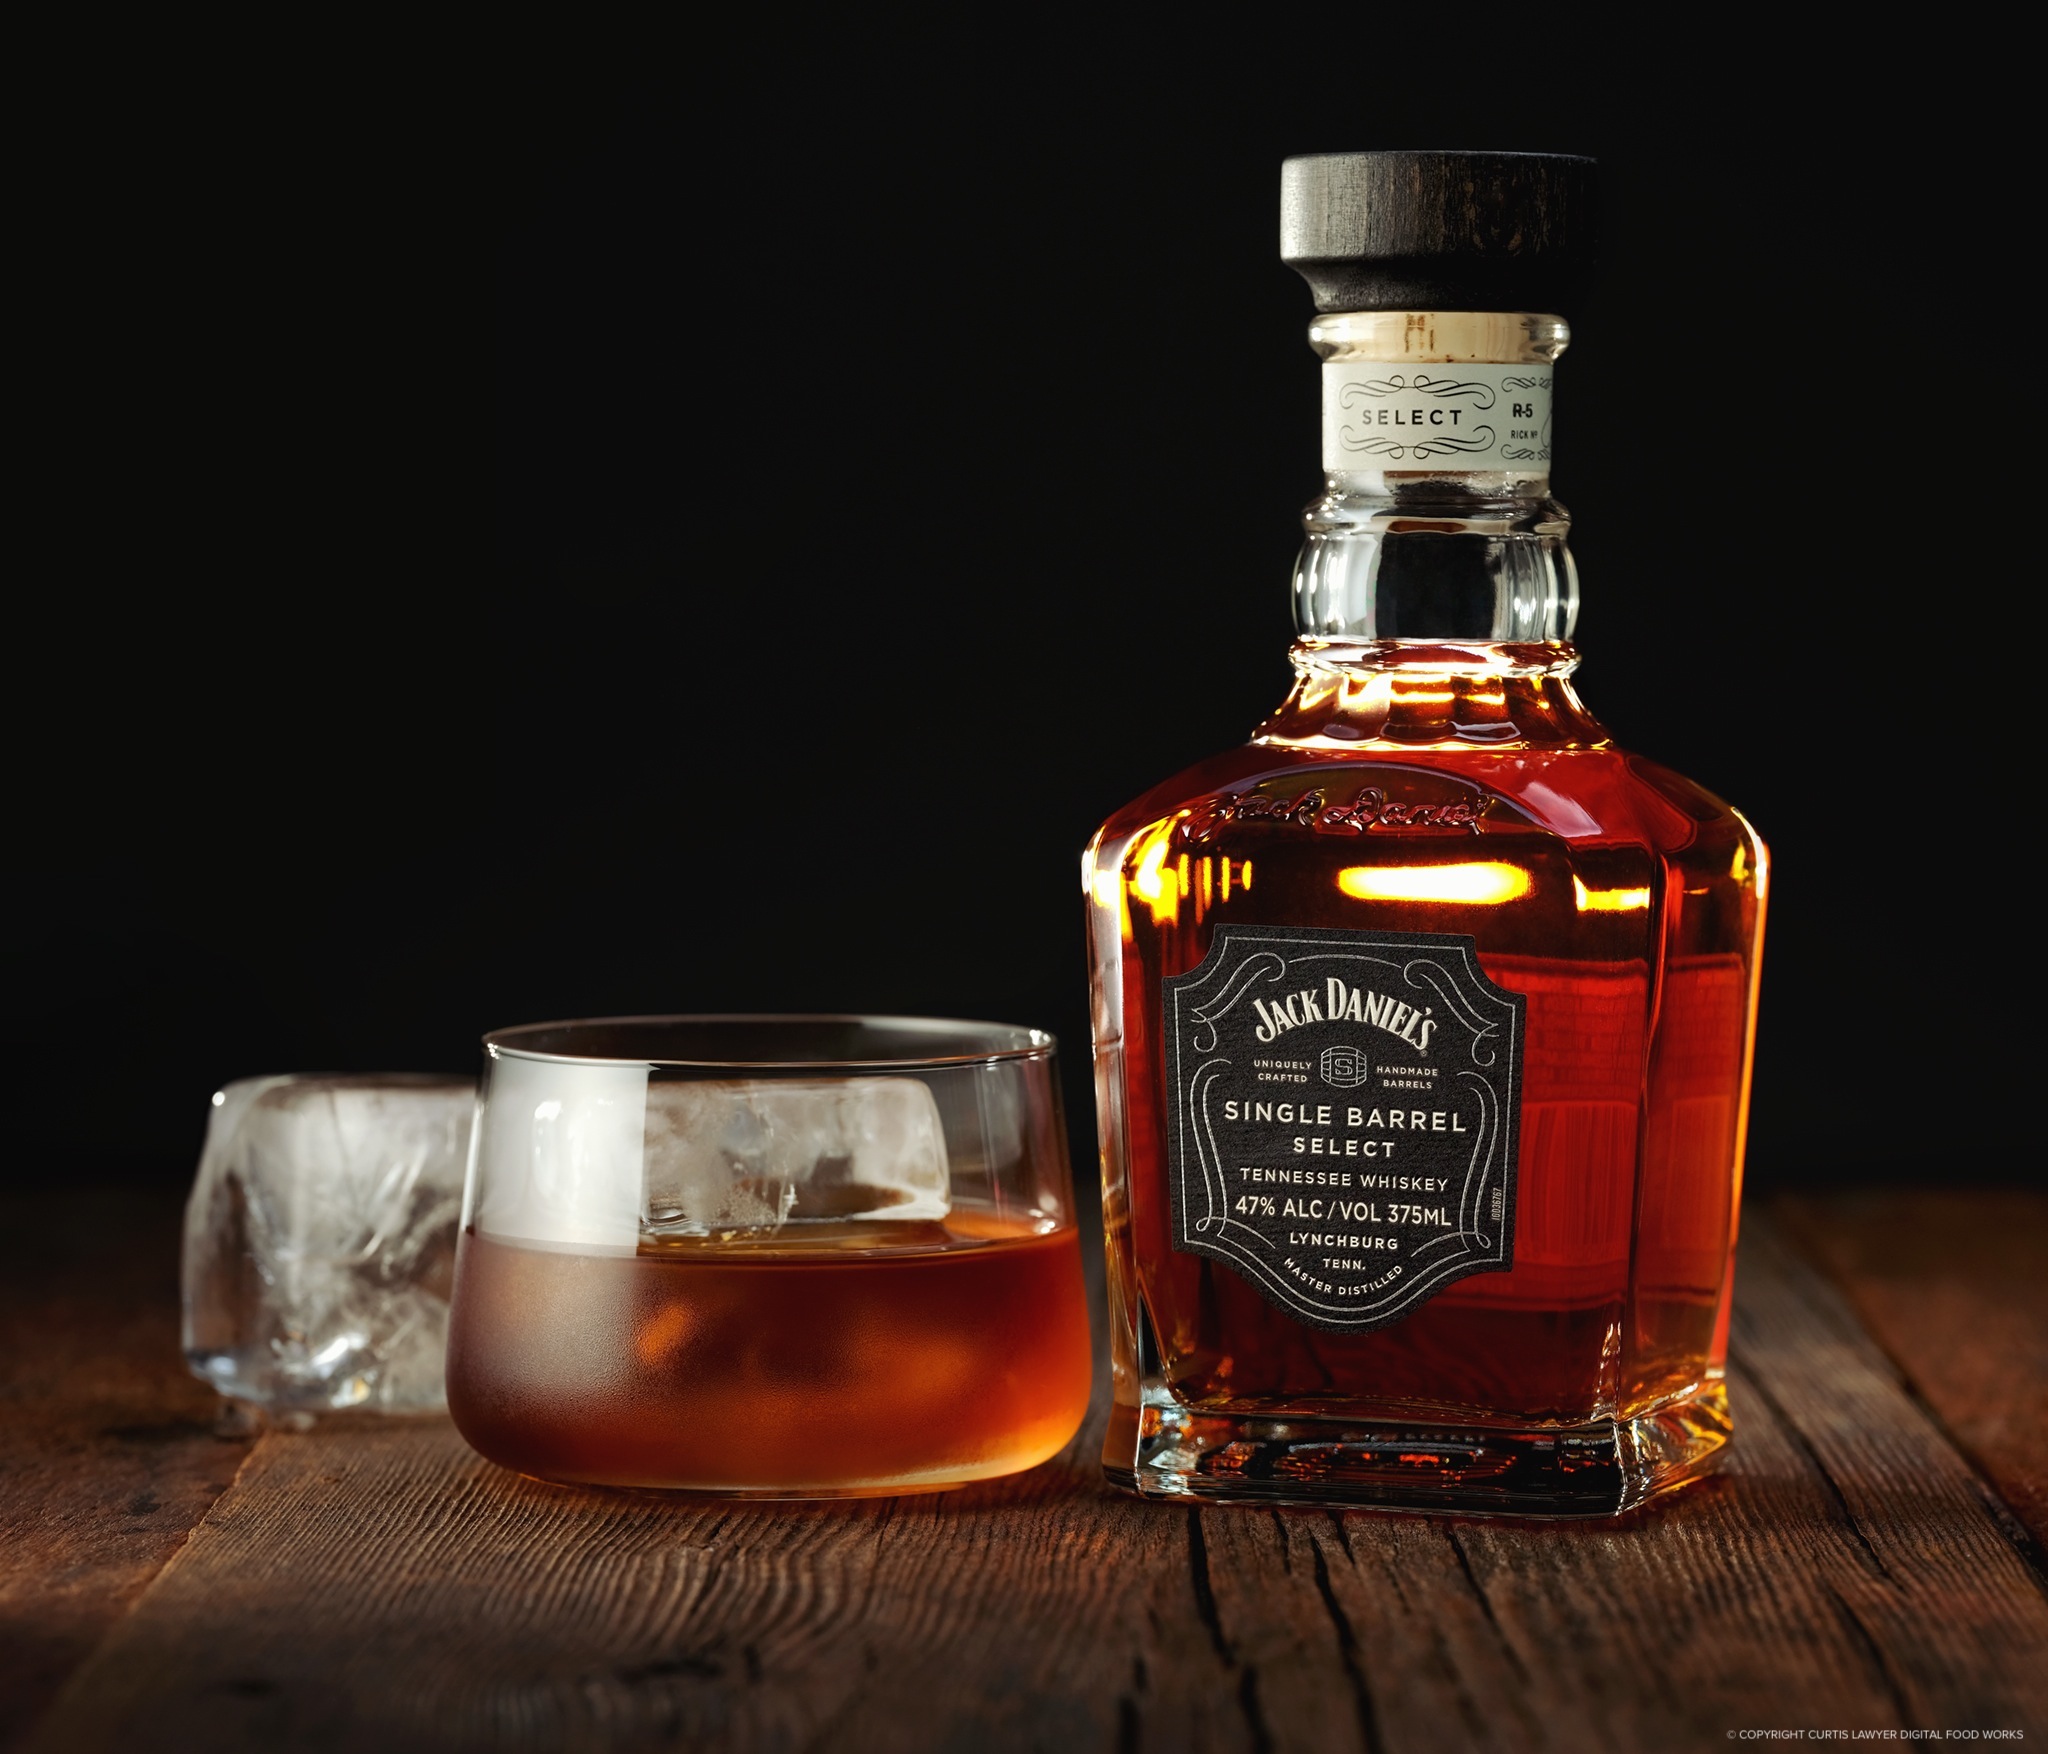
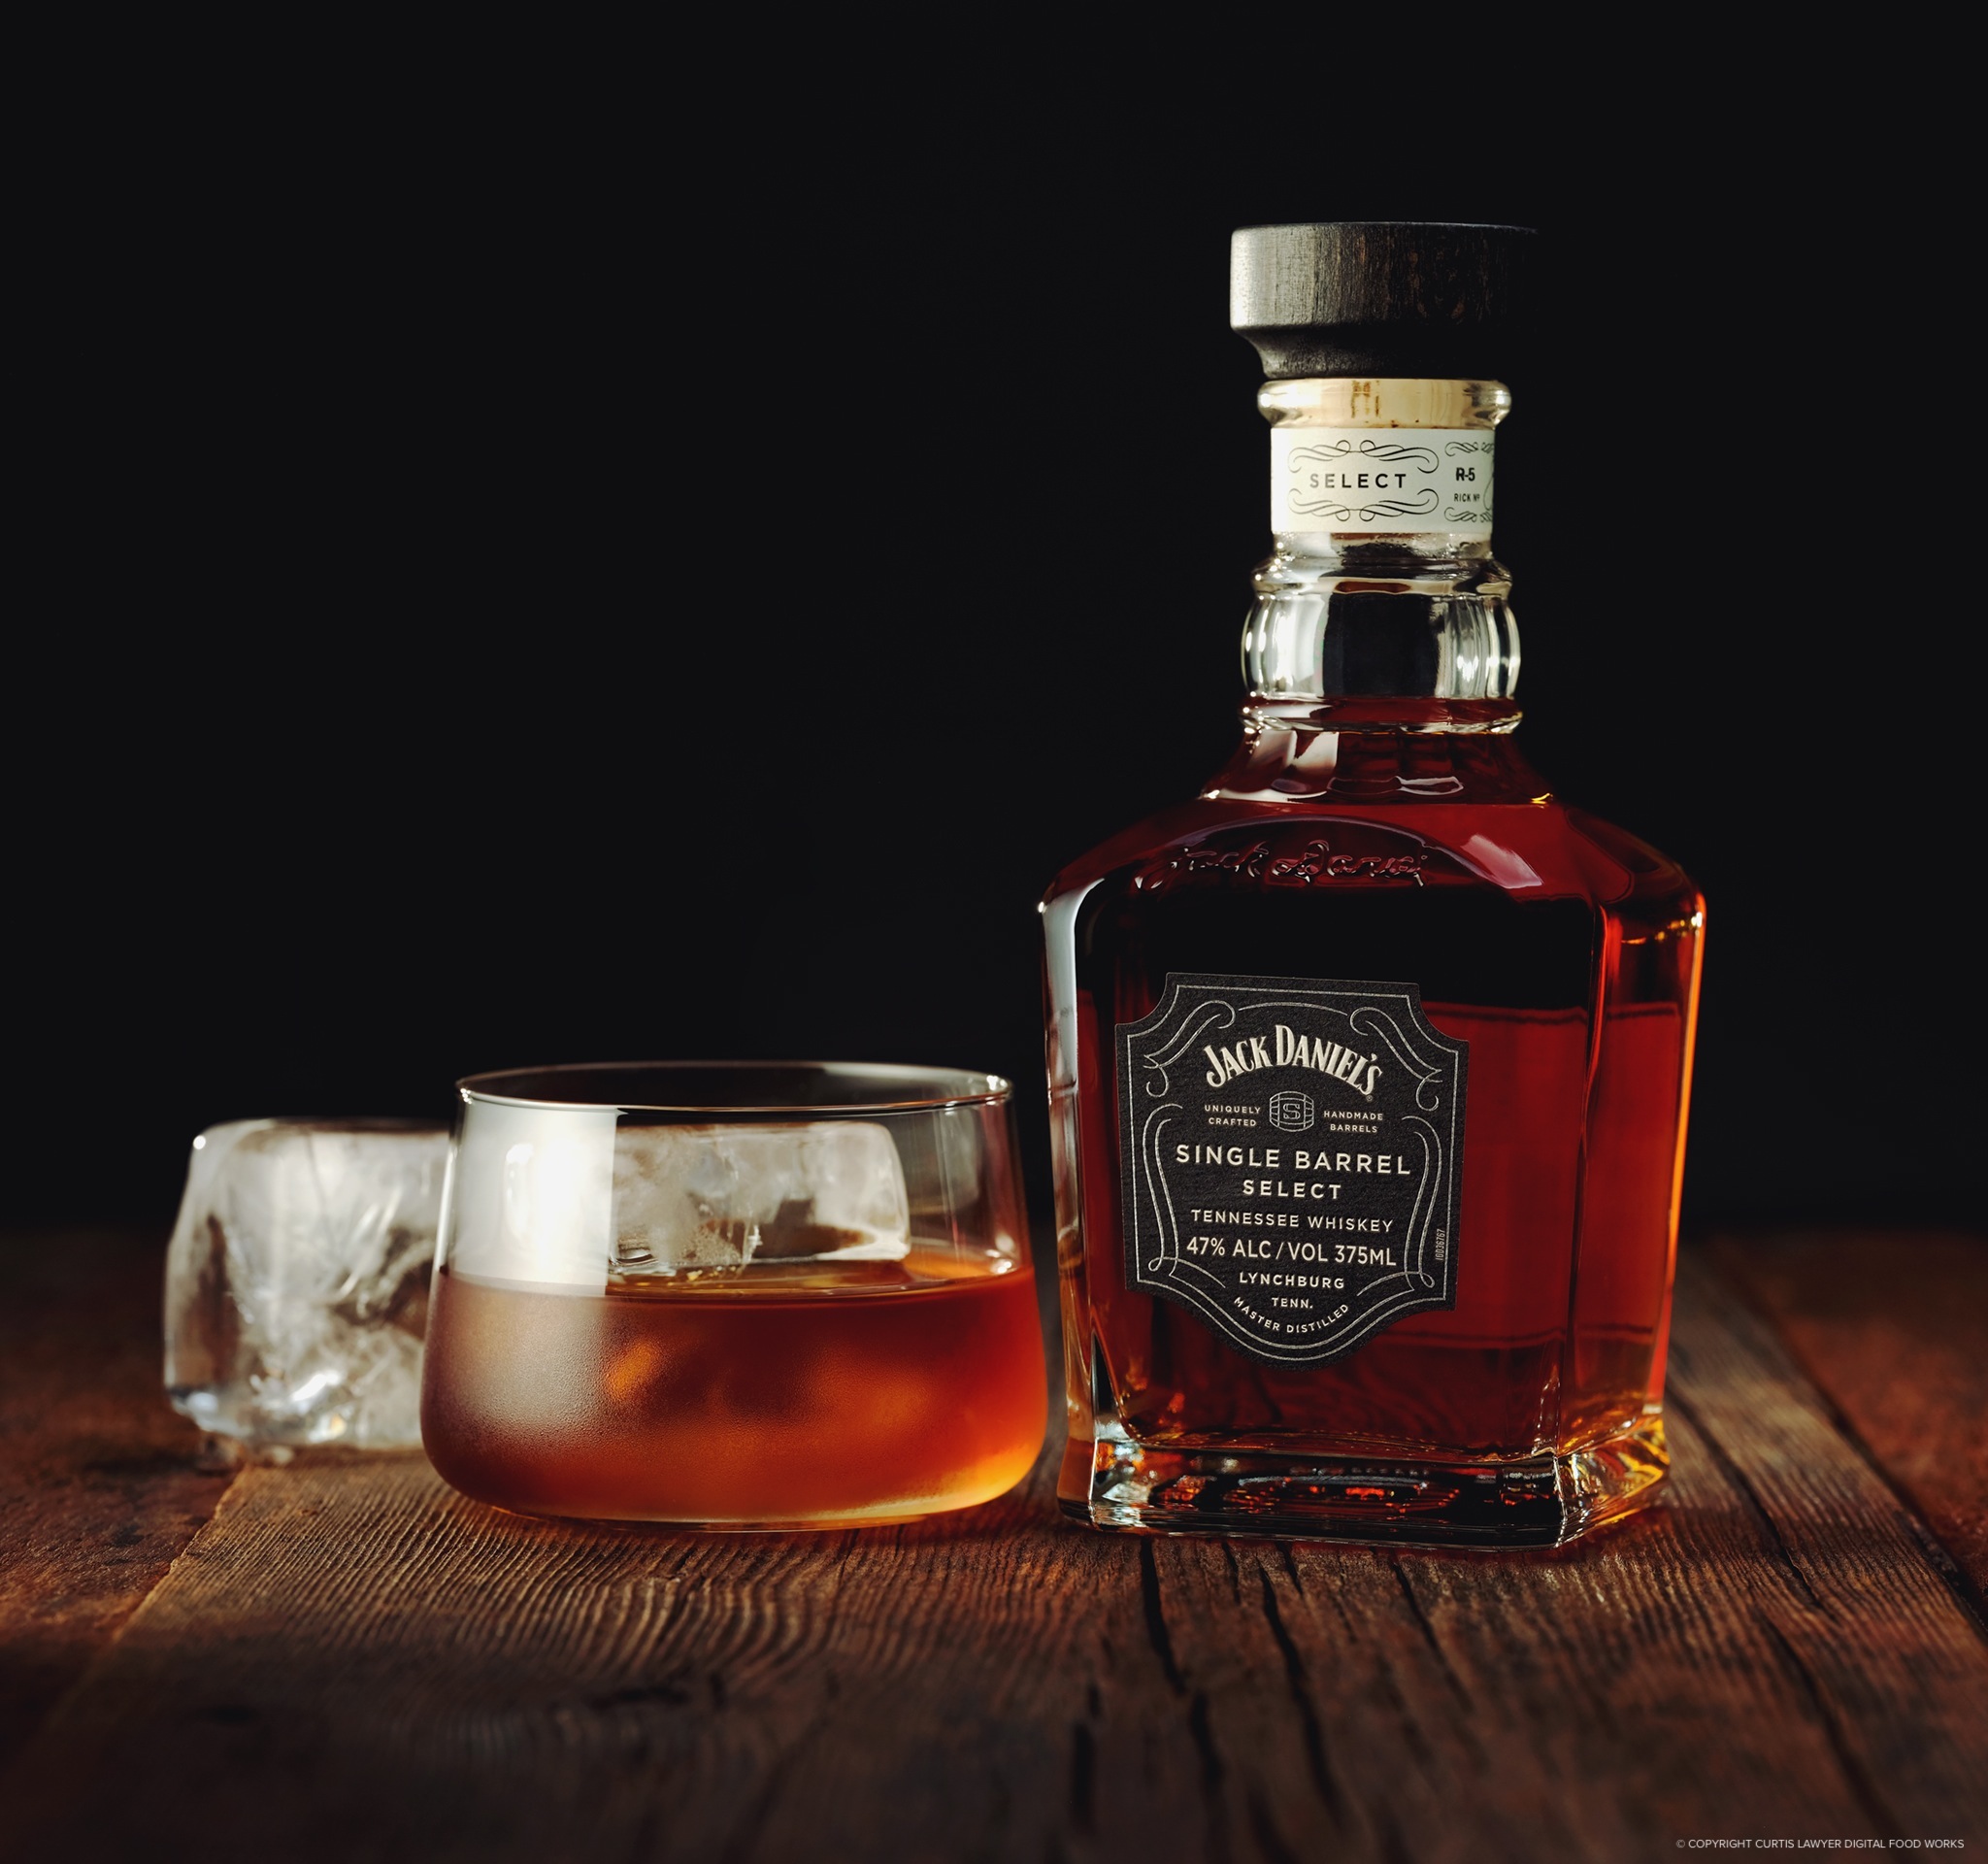
A bottle of Jack Daniel's Single Barrel Select.
Unlike the donut sticks photo, there's not a lot of staging and extra element around this time. A bottle of Jack Daniel's Single Barrel Select is such an American Classic — I didn't feel it needed a lot of propping up. So I just have the bottle, a short whiskey glass, and a couple of ice cubes.
I know, I know… you shouldn't water a glass of good whiskey down with an ice cube. But in this case, I wanted to get a little condensation going on the glass. The quickest way to do that, was with a couple of big old ice cubes.
The Overhead Lighting Diagram
Here again, giving the power setting is not really useful, because all lighting gear is a little different. The "Main Light" (which is Flash #1 in this case), is pretty much at full power, while the other lights in the setup are all less powerful than that.It's important to note, that when no flashes are on… the photo would be 100% totally dark. All light in the photos, is being generated by a flash unit. So what you see in some of the following photos may be a bit dark... but that is "exactly" what the light is adding to the final exposure.
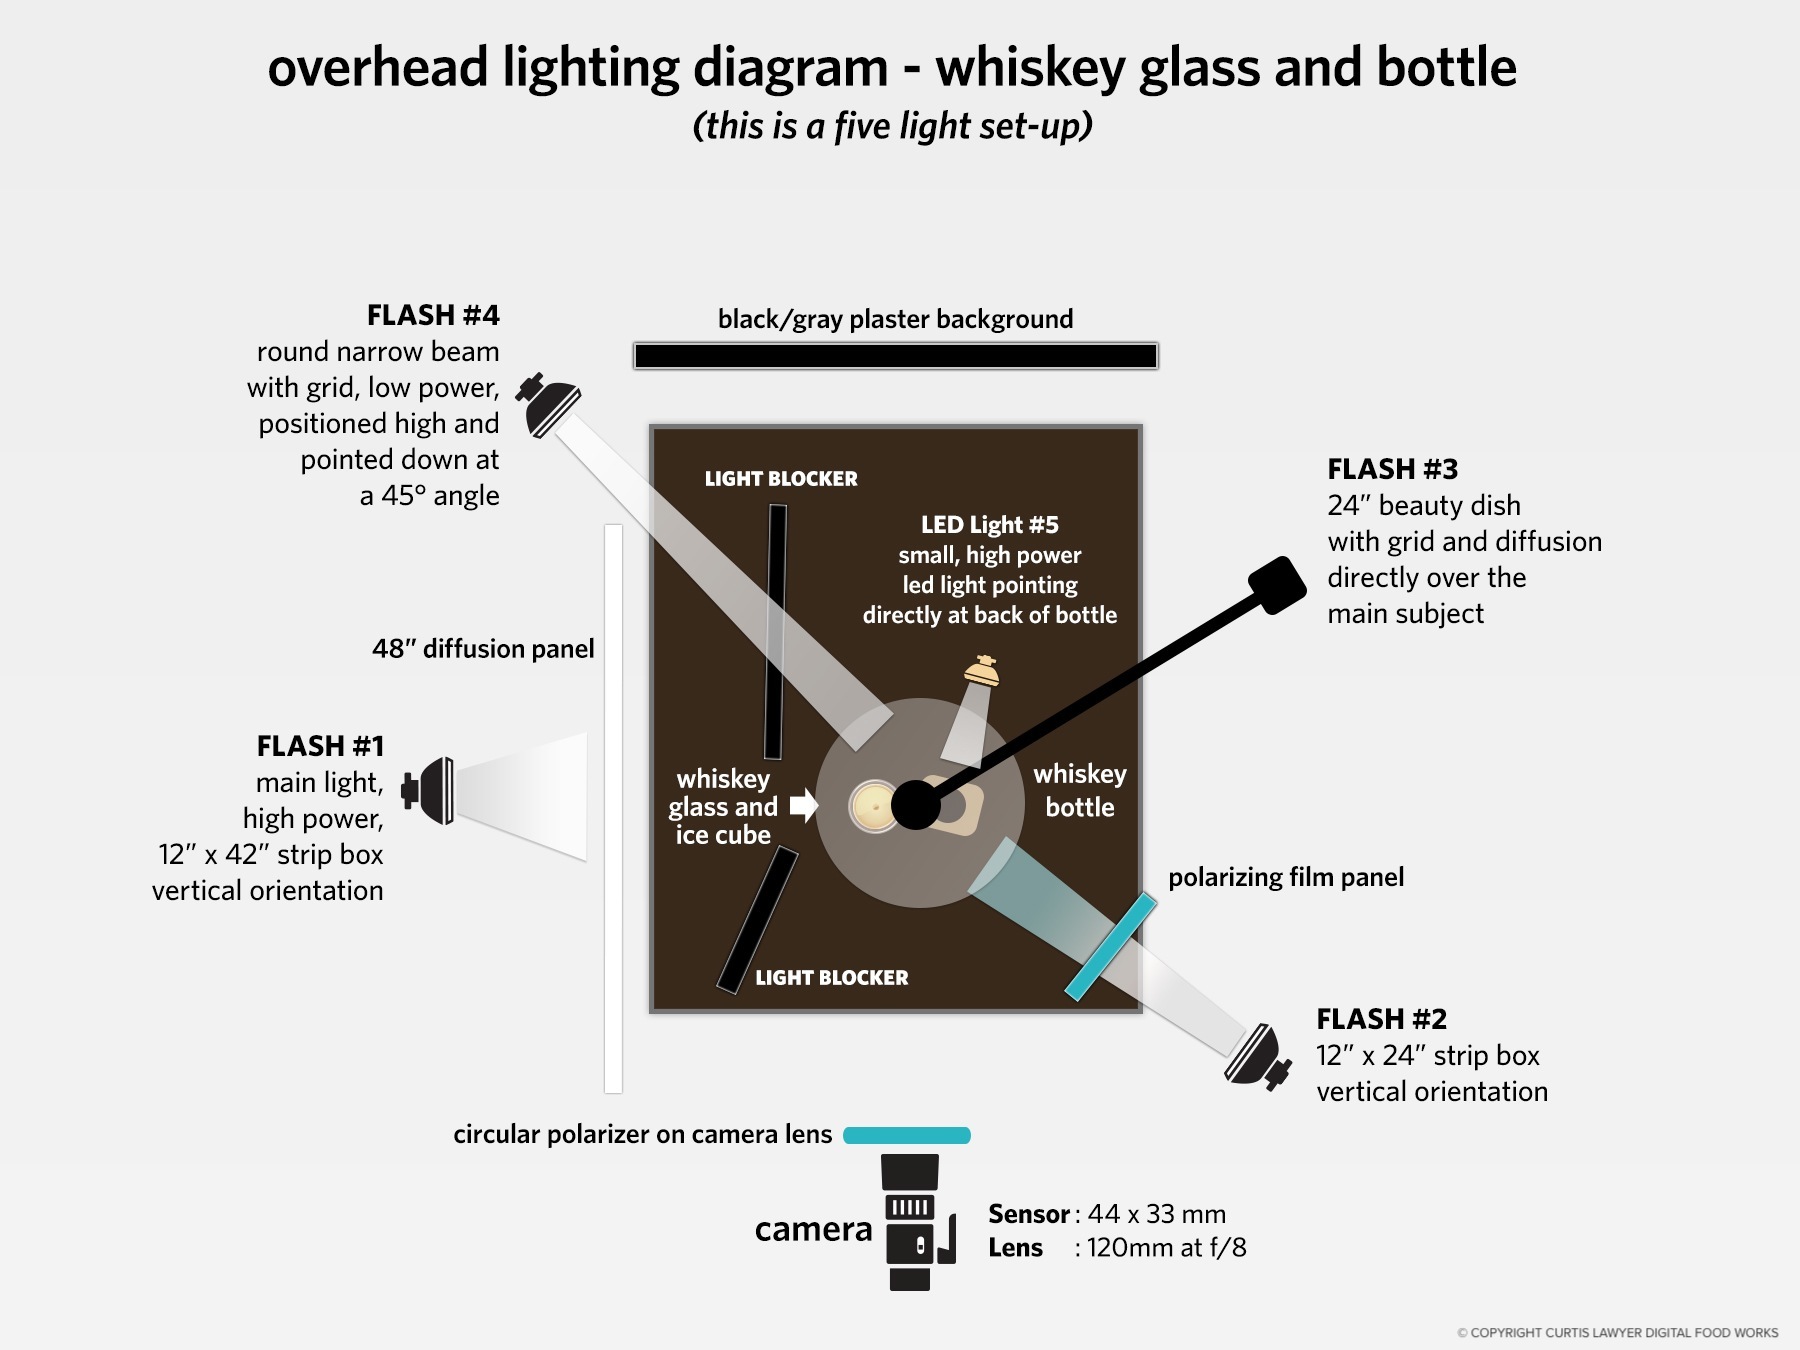
An overhead layout showing where all five lights are positioned, and what modifiers were used on each.
Here's an overhead diagram of where the four flash units were positioned for the photo. There is a fifth light source behind the bottle as well… but it's a very small LED light (continuous light), that was set on low power… to provide some more interest and color in the whiskey bottle.
Let's see what each flash in the setup is doing — just by itself. Flash #1 is the "Main Flash" and it's positioned to the left of the main subject. It's providing the most light to the scene. I was using a 12" x 42" strip box, and shooting it through a 48" diffusion panel, directly to the left of the glass and whiskey bottle. The main light was being blocked off — behind and in front of the main subject — so that just a thin strip of light was making it onto the scene.
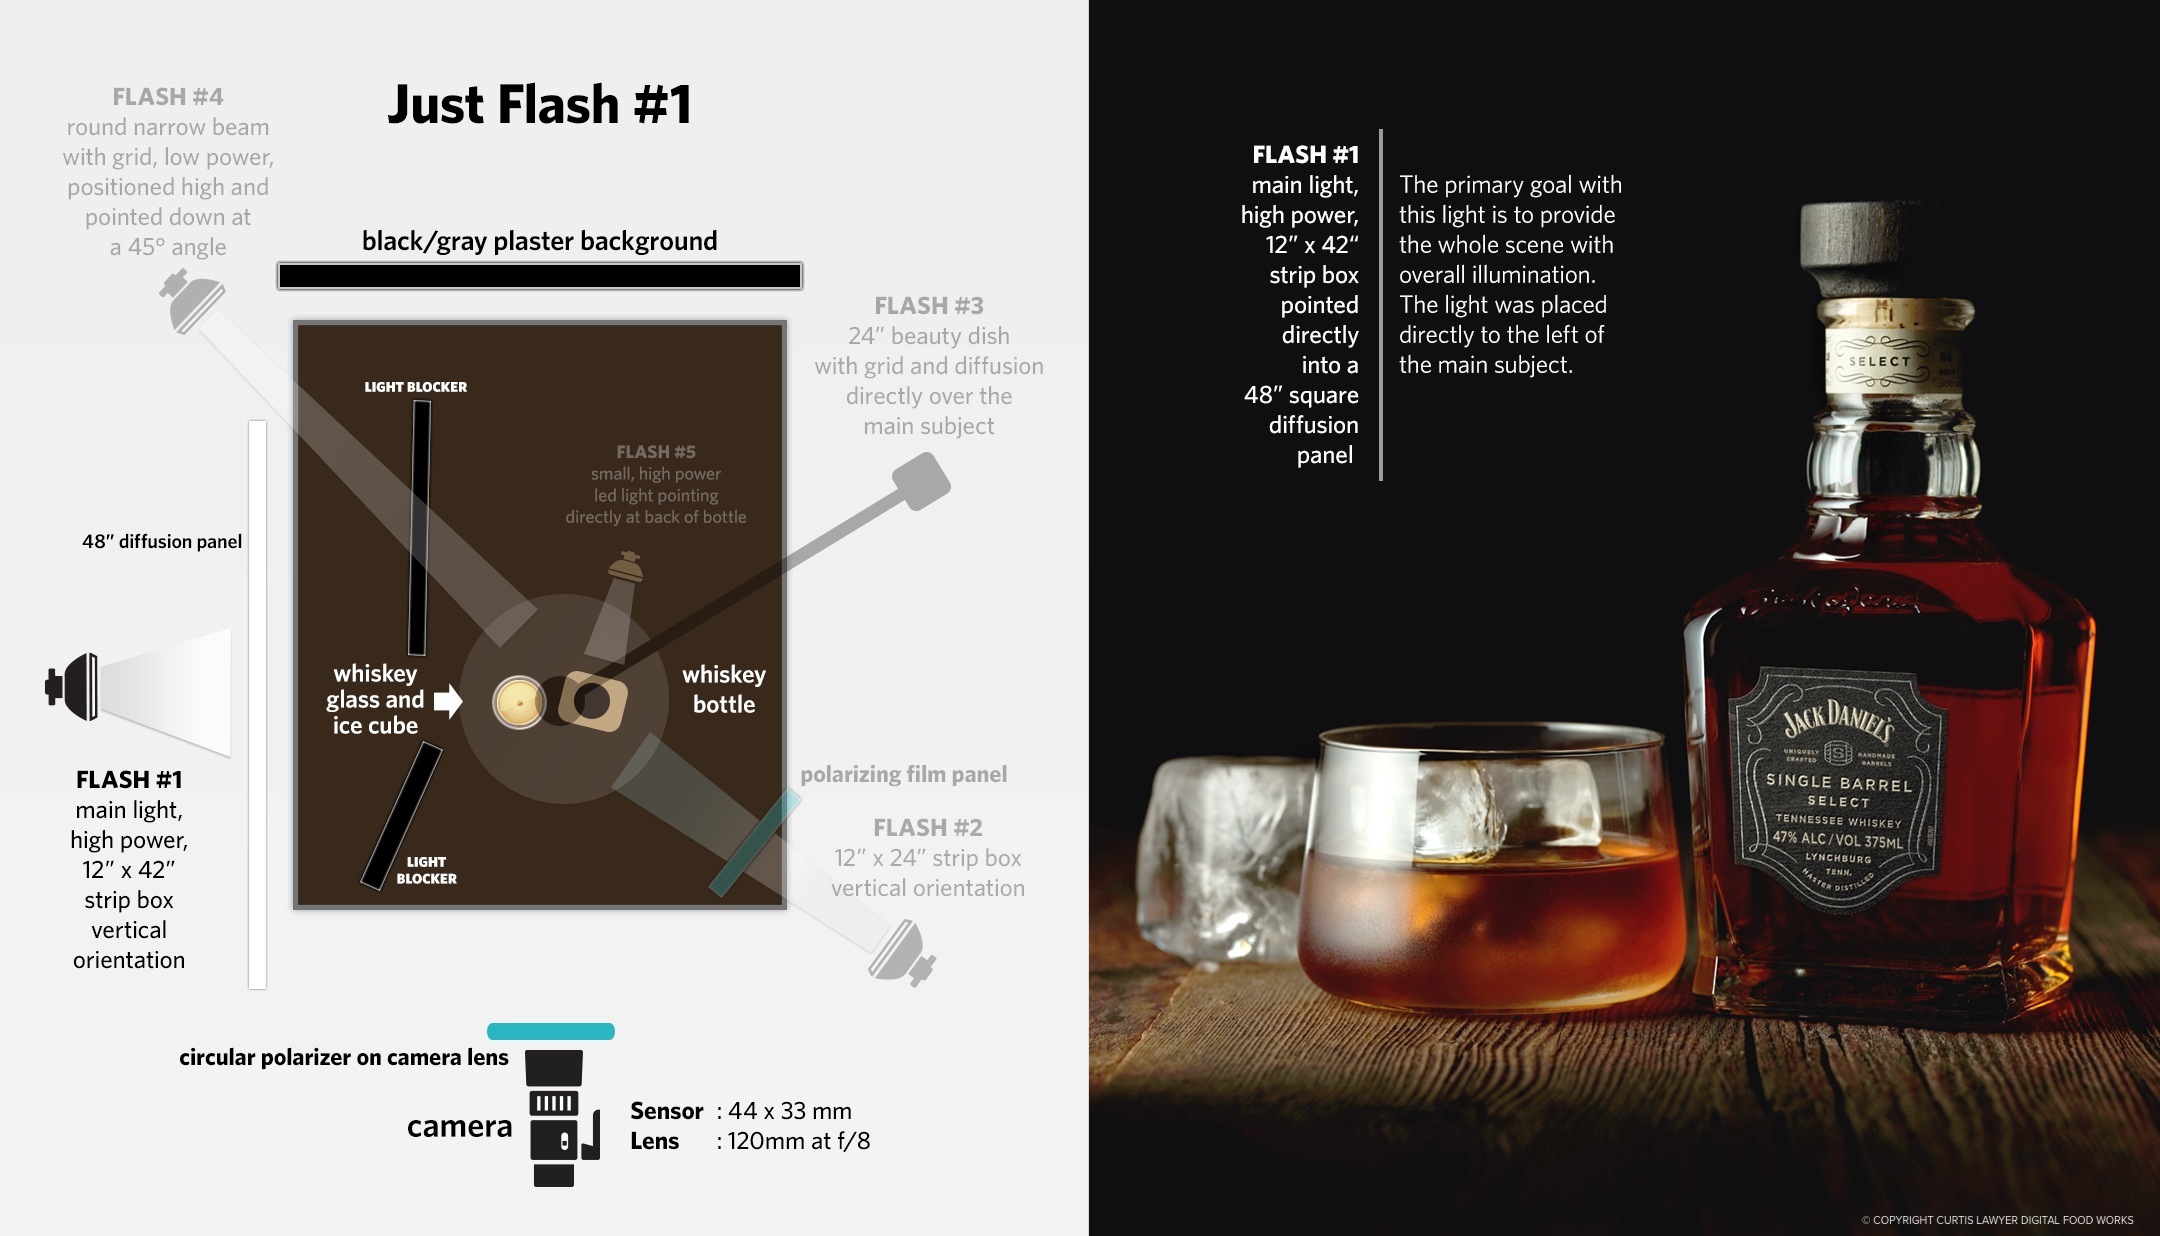
Flash #1 is the "Main Light" — providing the whole scene with overall illumination.
Now this is a pretty great shot, just with that one light! But I was starting to feel that the label on the front of the bottle and around the top neck of the bottle should be just a little brighter. In photos where there's a product and the package that the product comes in — both of those things have to be the star, and draw you in. Even though the moodiness of the "one light" set up is great — the creative director in me kept saying "I need the label to be clear too".
So Flash #2 was set up on the opposite side of the bottle, to brighten up the main label and the neck label. This is where it gets a little tricky though. Even though I was using a small 12" x 24" strip box (in vertical orientation), there was still too much light hitting the bottle and glass. I really just wanted to light the labels.
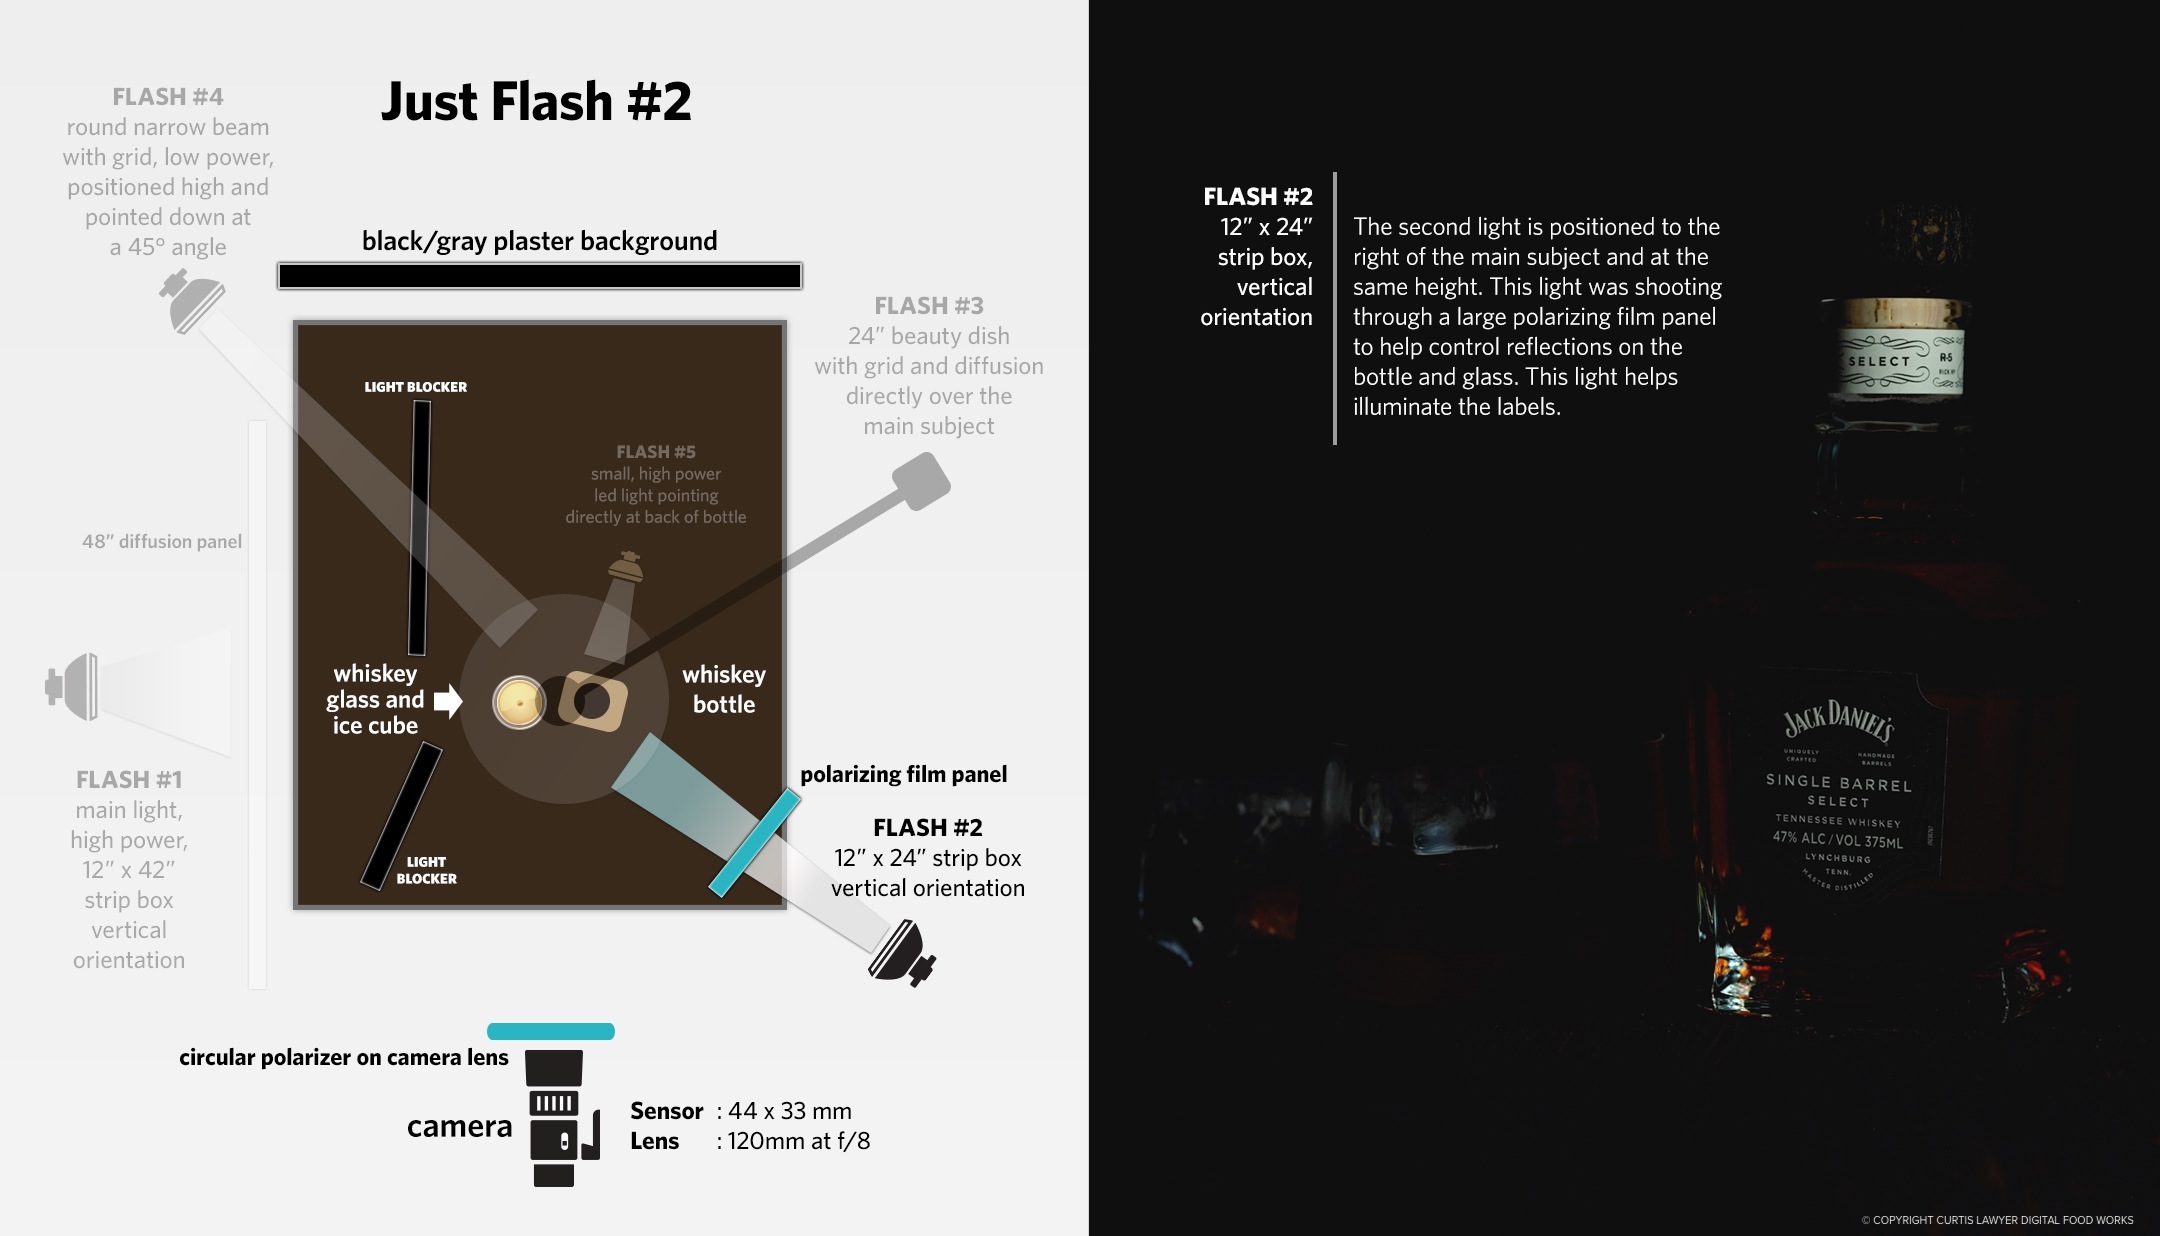
There's a sheet of polarizing film between Flash #2 and the whiskey bottle. Together with a circular polarizer on the lens, the combination reduces the reflections from the glass and makes it appear as if only the labels are being illuminated.
That's when a circular polarizer went on the camera lens and a full sheet of polarization film went in between Flash #2 and the bottle. With the light and the camera lens being polarized, I could almost totally dial out, and reject the light bouncing of the glass — which made it look like that light was only illuminating the labels.
Next up is Flash #3, and this time — a 24" circular beauty dish was used, with a grid and diffusion — positioned directly over the top of the main subject, pointing straight down.
This was a very low intensity light, that does two things. First, it provides a little illumination around the scene — almost vignetting the subject in a circle of light. This gives the wood surface in front of the main subject a little more light and color.
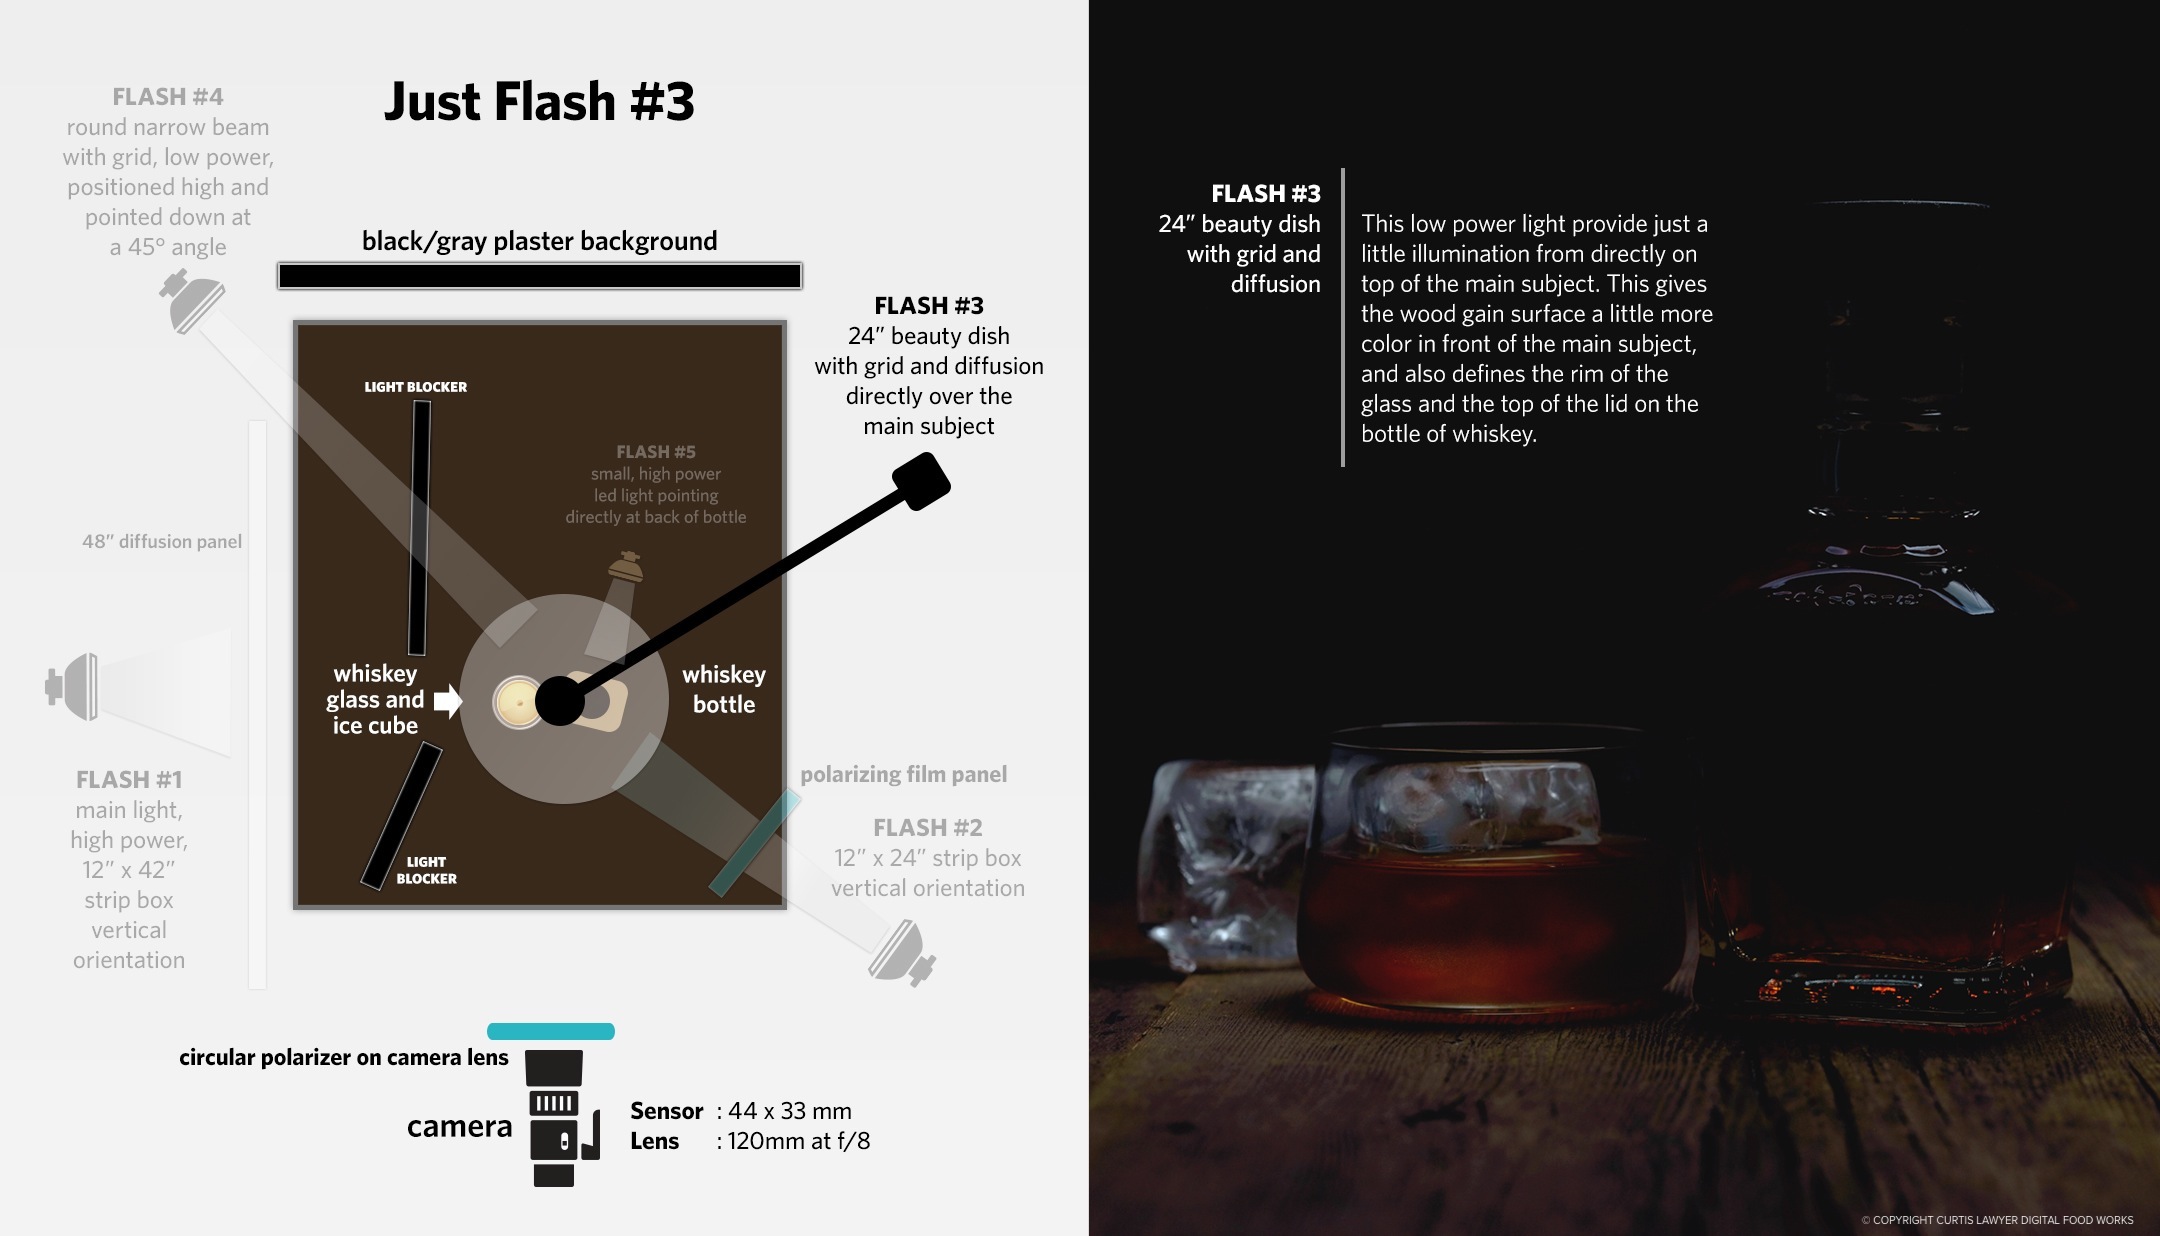
Flash #3 is positioned directly on top of the main subjects and pointing straight down.
The second important thing this light does — is to sharply define the rim around the glass and then also give wooden top on the bottle a true "top". With all the other lights, the "top" of the bottle fades into the black background, so we're not sure where it is. Now, it has a definite "top", highlighted with a thin reflection of light.
Flash #4 is the one that "maybe" wasn't so necessary, but I really liked the extra sparkle that it added to the glass, the bottle, and the ice.
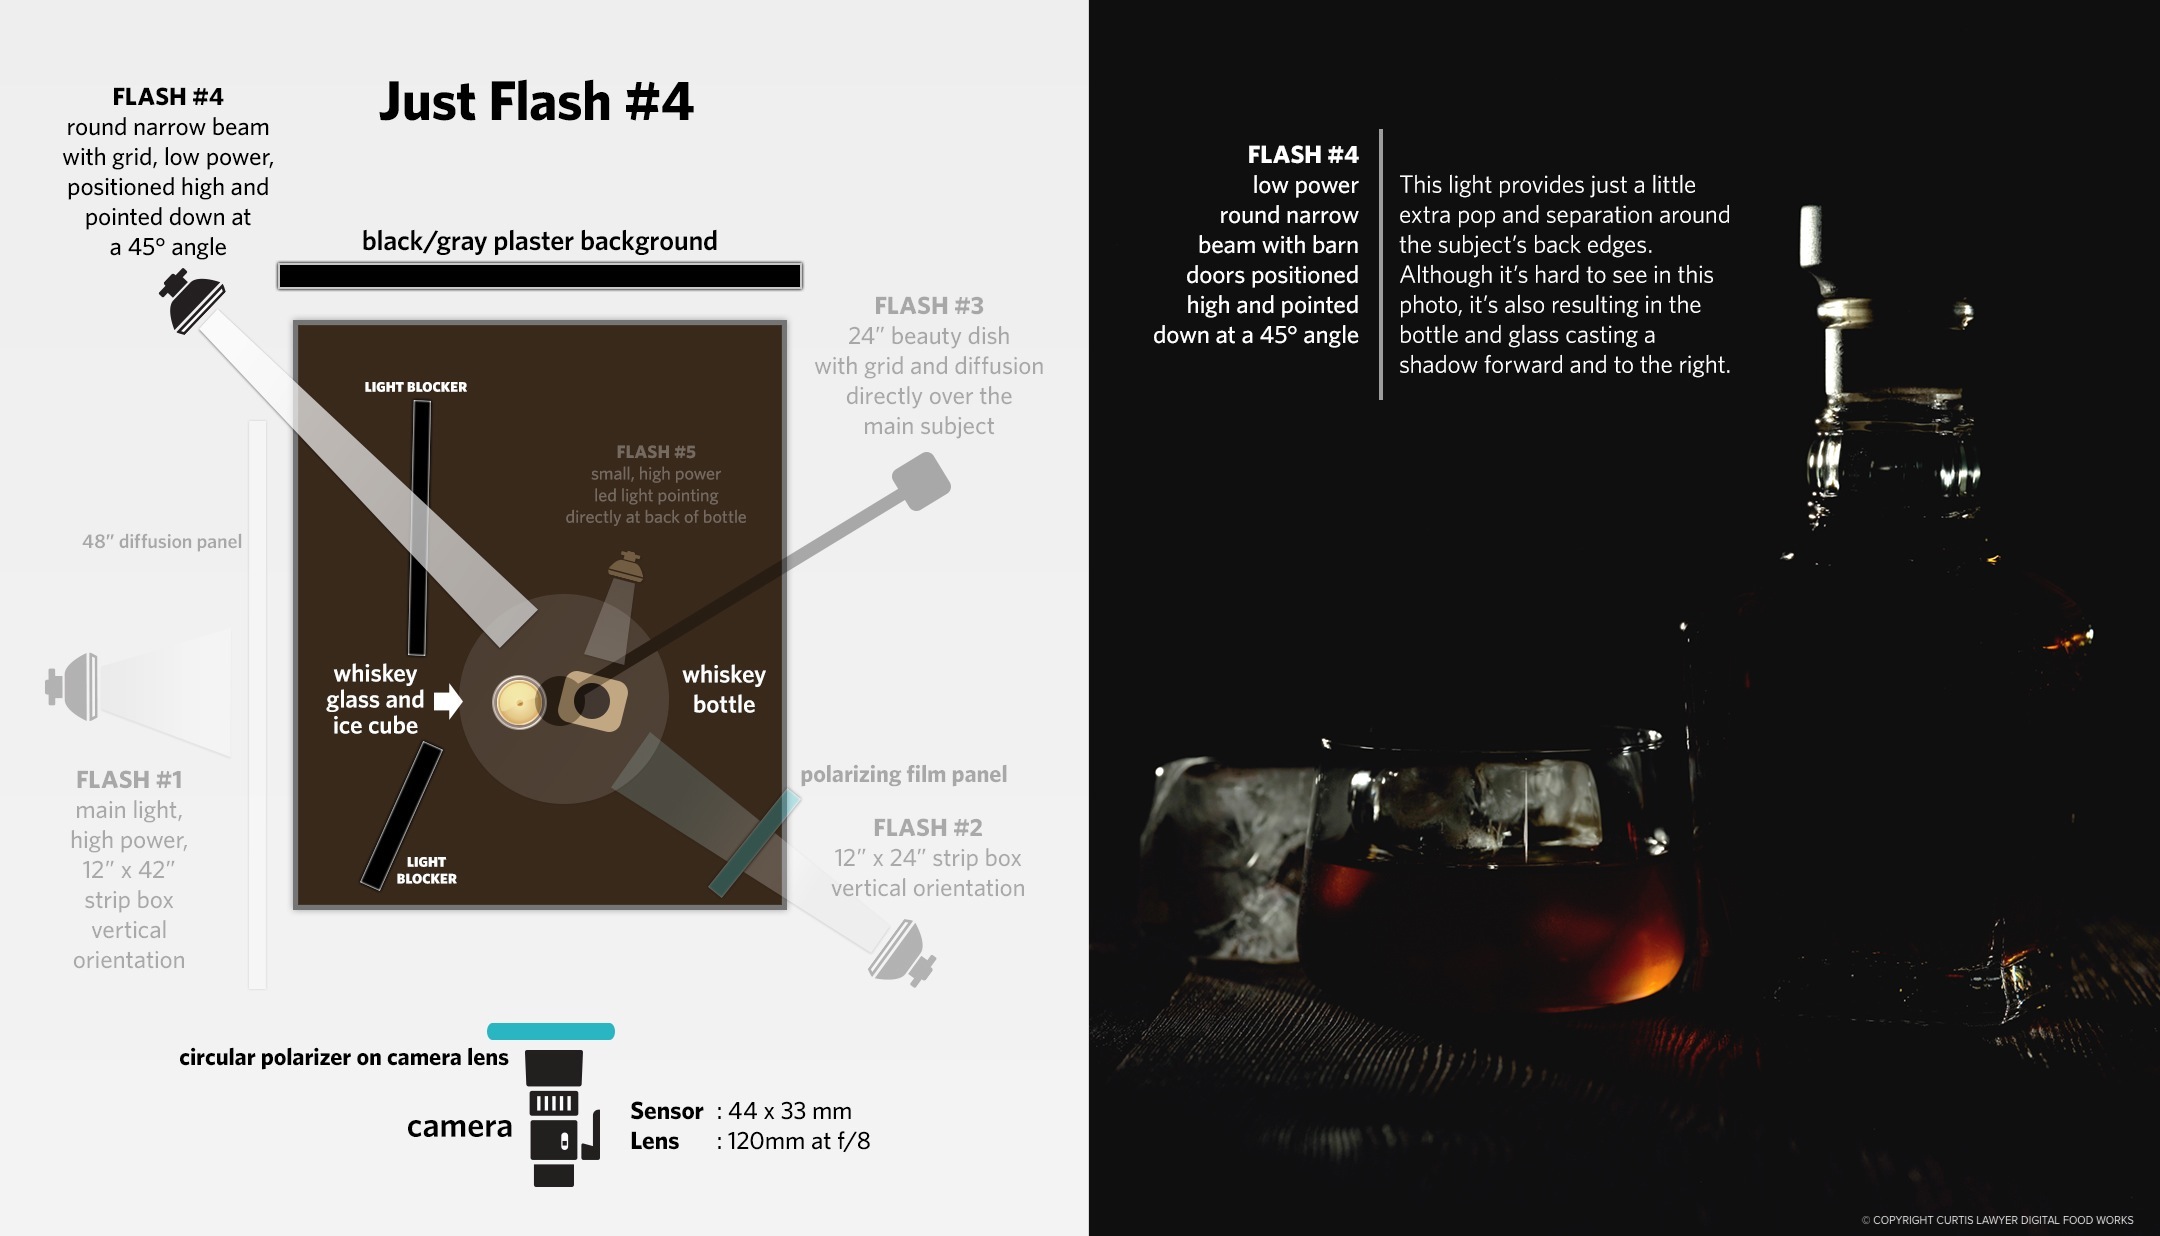
Flash #4 provides a bit of "sparkle" to the image and creates an amber glow at the bottom of the whiskey glass.
Flash #4 is also adding a glow to the bottom of the whiskey glass, and to a lesser degree, the bottle as well — and that amber shadow is being cast forward and to the right. It's not super easy to see on just the "Flash #4" photo, but once all of the flashes are fired at the same time — it creates a little mysterious warmth to the wood that's in front of the glass and bottle.
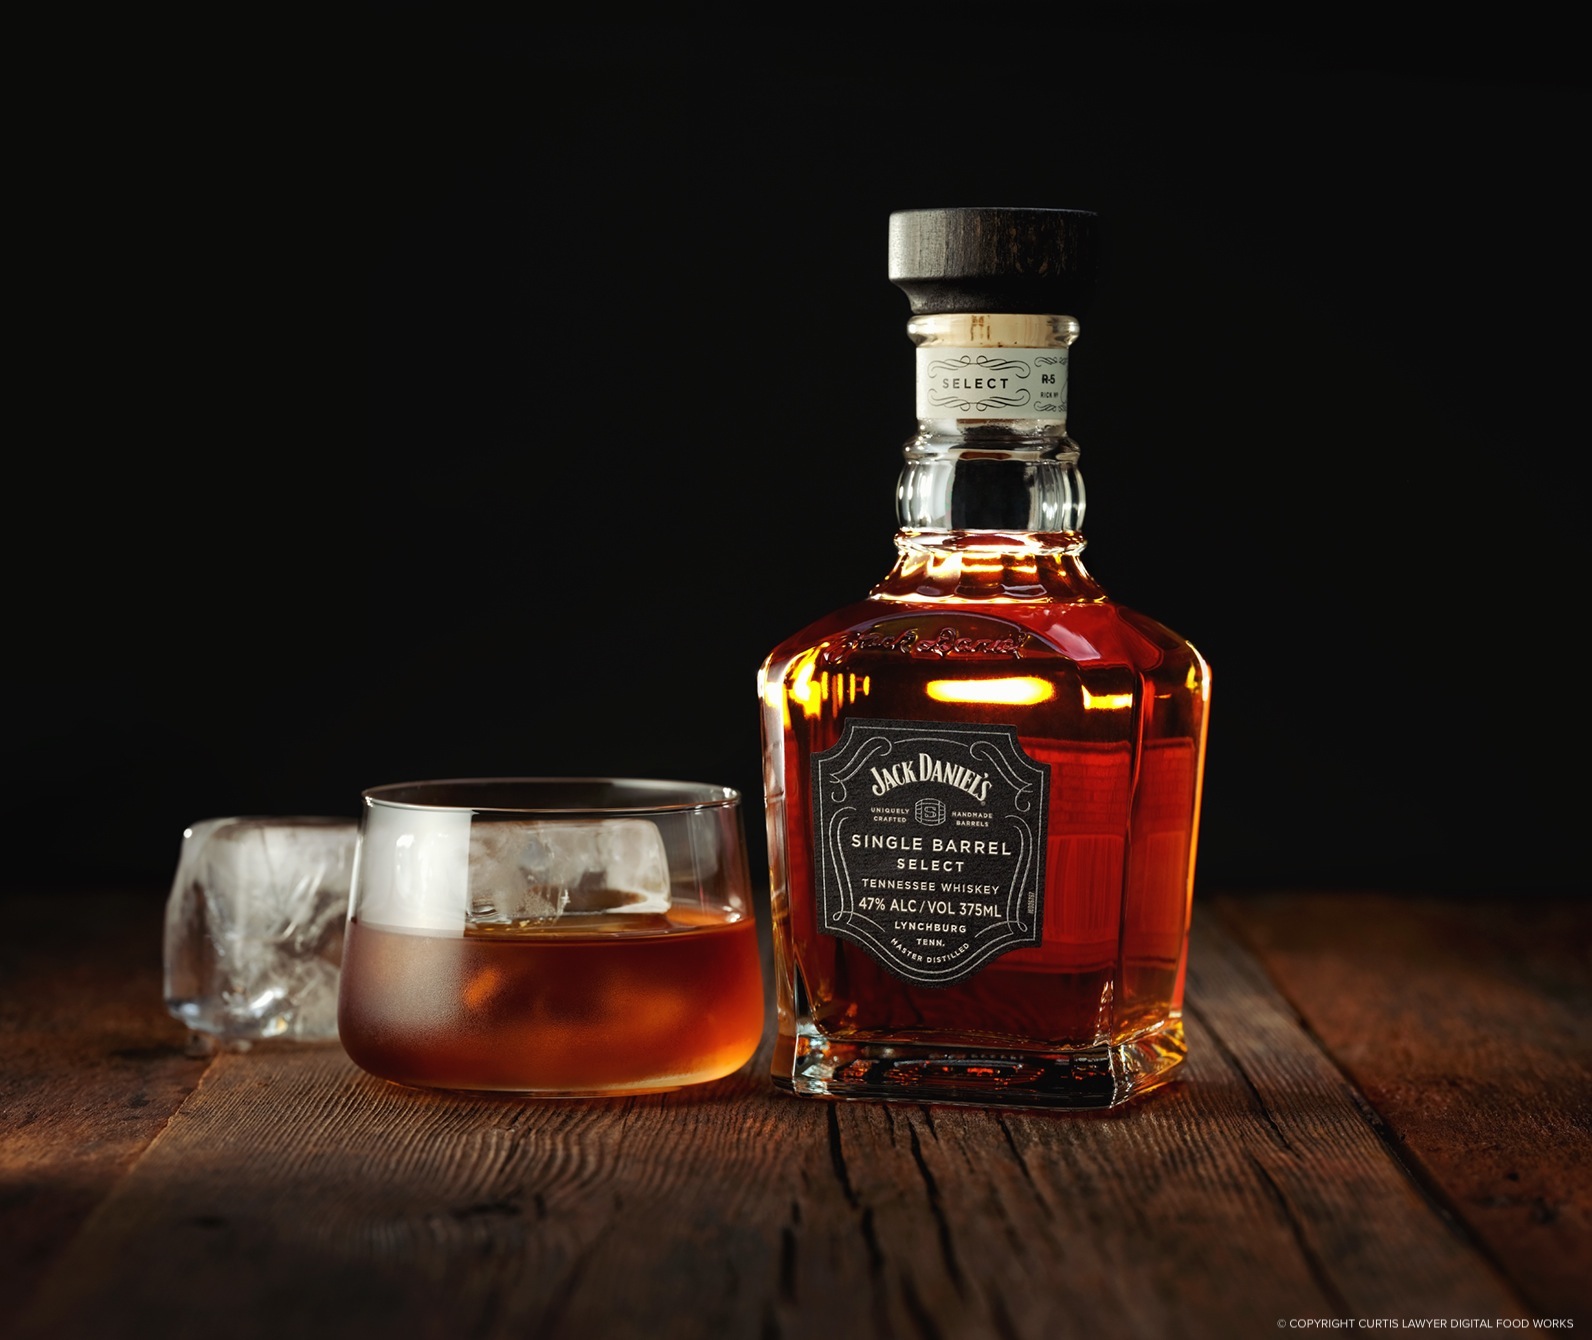
Finally, there was one more tiny light involved — Light #5 is a small, continuous, LED light that was placed behind the whiskey bottle (on a very small stand) and positioned so that it would shine directly though the bottle.
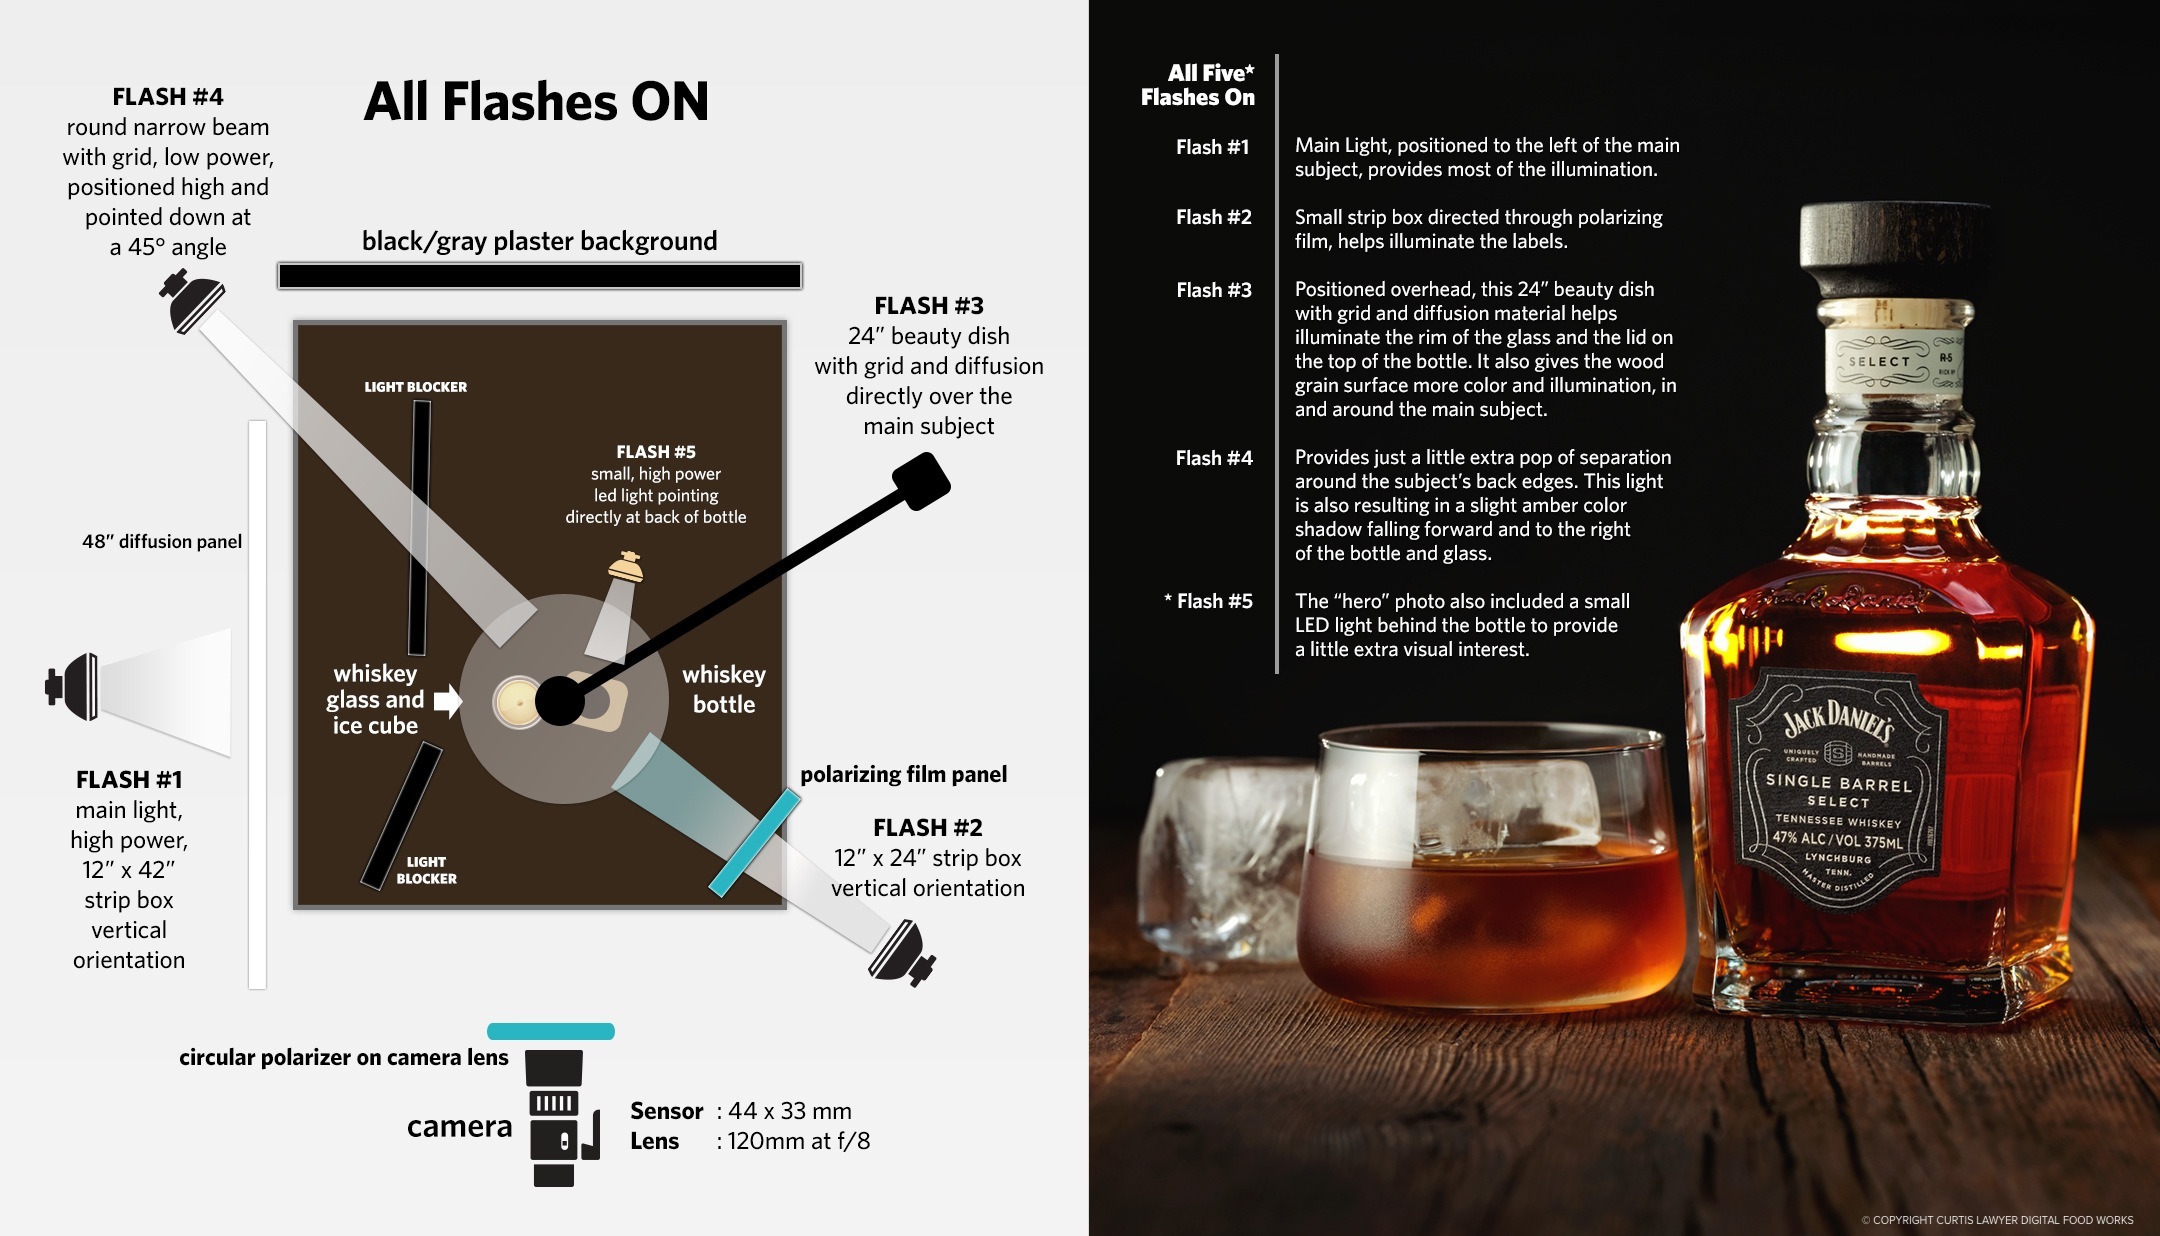
All five lights are on in this photo. Light number five is a small LED light, behind the bottle of whiskey.
The light provides a little extra color and shimmering warmth to an area in the photo that seemed too dark. Now you can absolutely see that there's whiskey in the bottle and we can even make out the shape of the bottle a little better.
Comparing the One Light Photo and the Five Light Photo
The next image is a comparison slider, with the "one light" photo of the scene on the left, and the "all five lights" photo of the scene on the right. Just drag the slider control in the center back and forth to compare the two images. (Sorry, the ice cube melted a little bit in between shots.)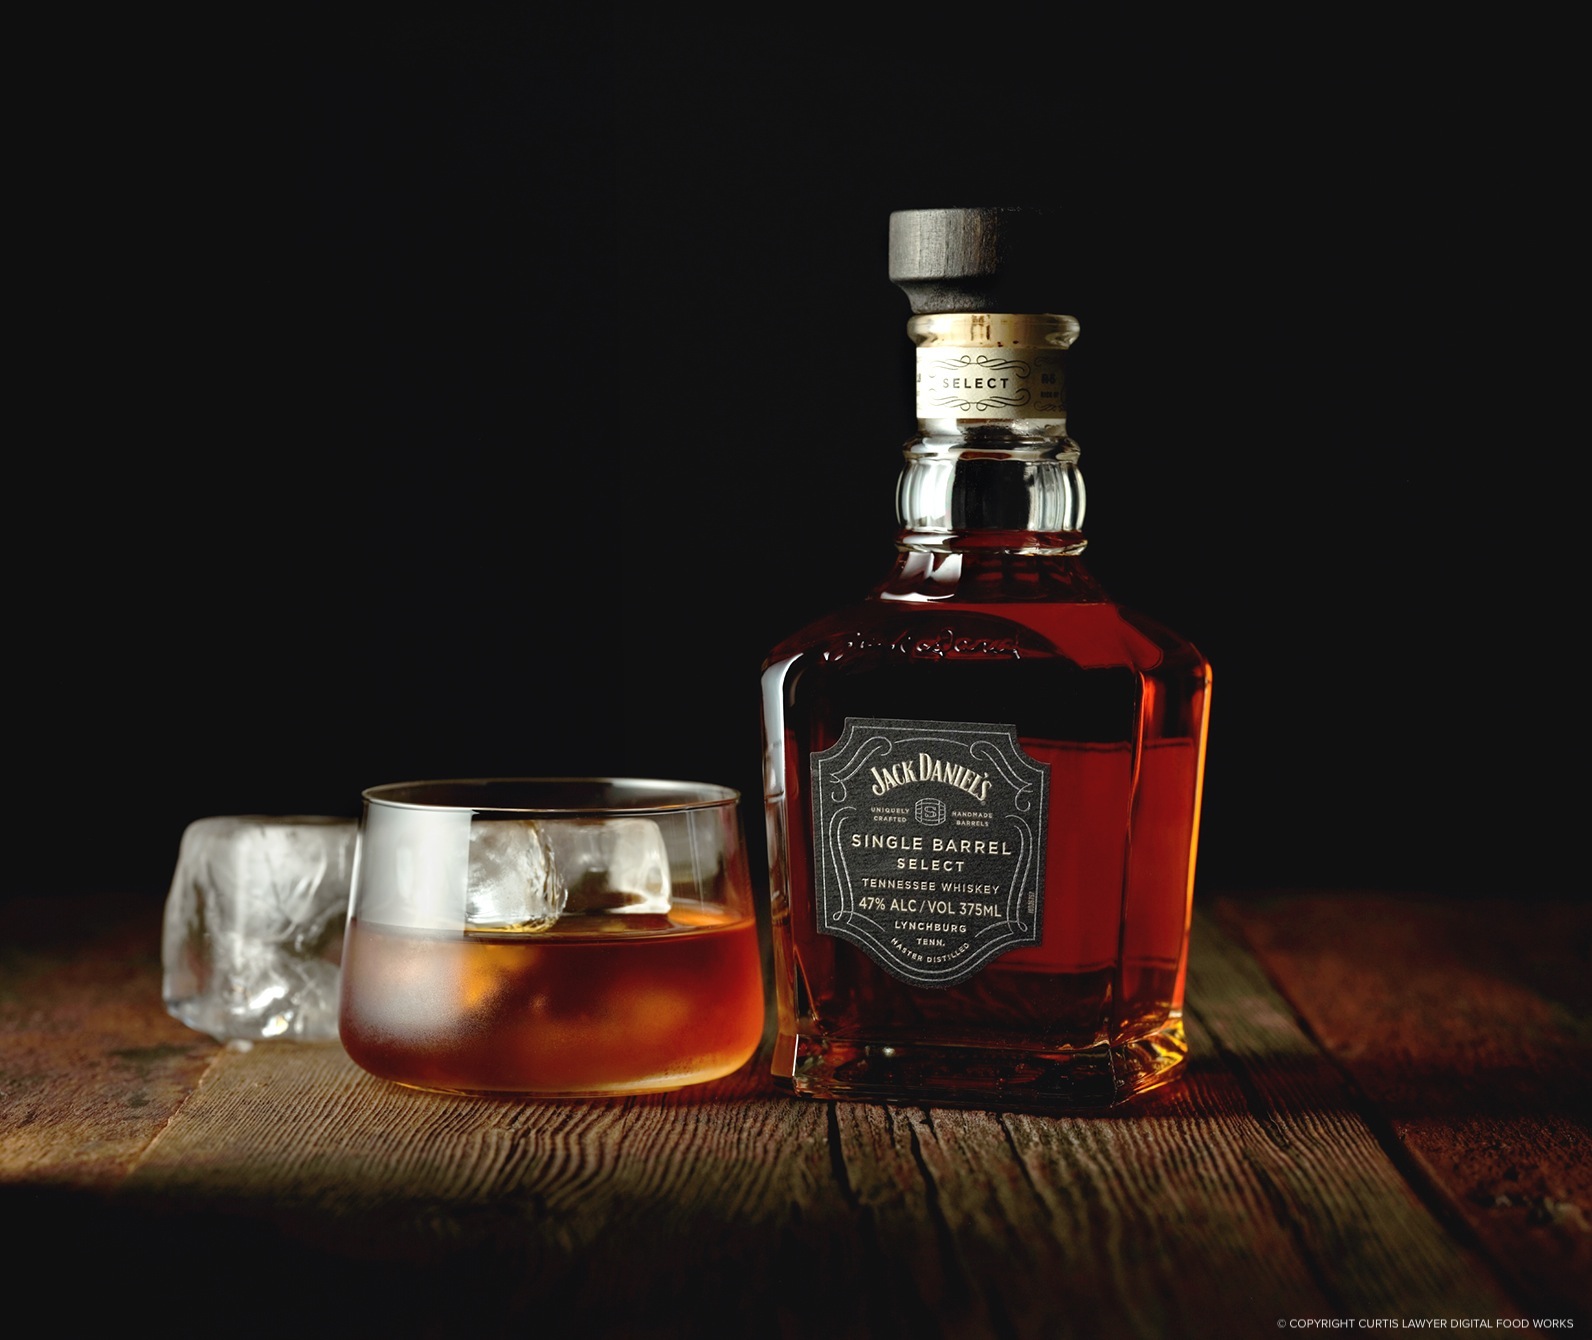 ONE LIGHT
 ALL FIVE LIGHTS
Both of the photos are pretty great, but while the "one light" photo is a little moody, dull, and possibly even murky in places — the "all five lights" photo pops a little more, has a little "edge" to it, and casts an amber glow that you might associate with a straight bourbon.
Bonus — Glass Condensation
As an extra bonus — check out all that gorgeous condensation on the outside of the glass! No "hairspray and glycerin" tricks here — that's just all 100% cold glass and humidity!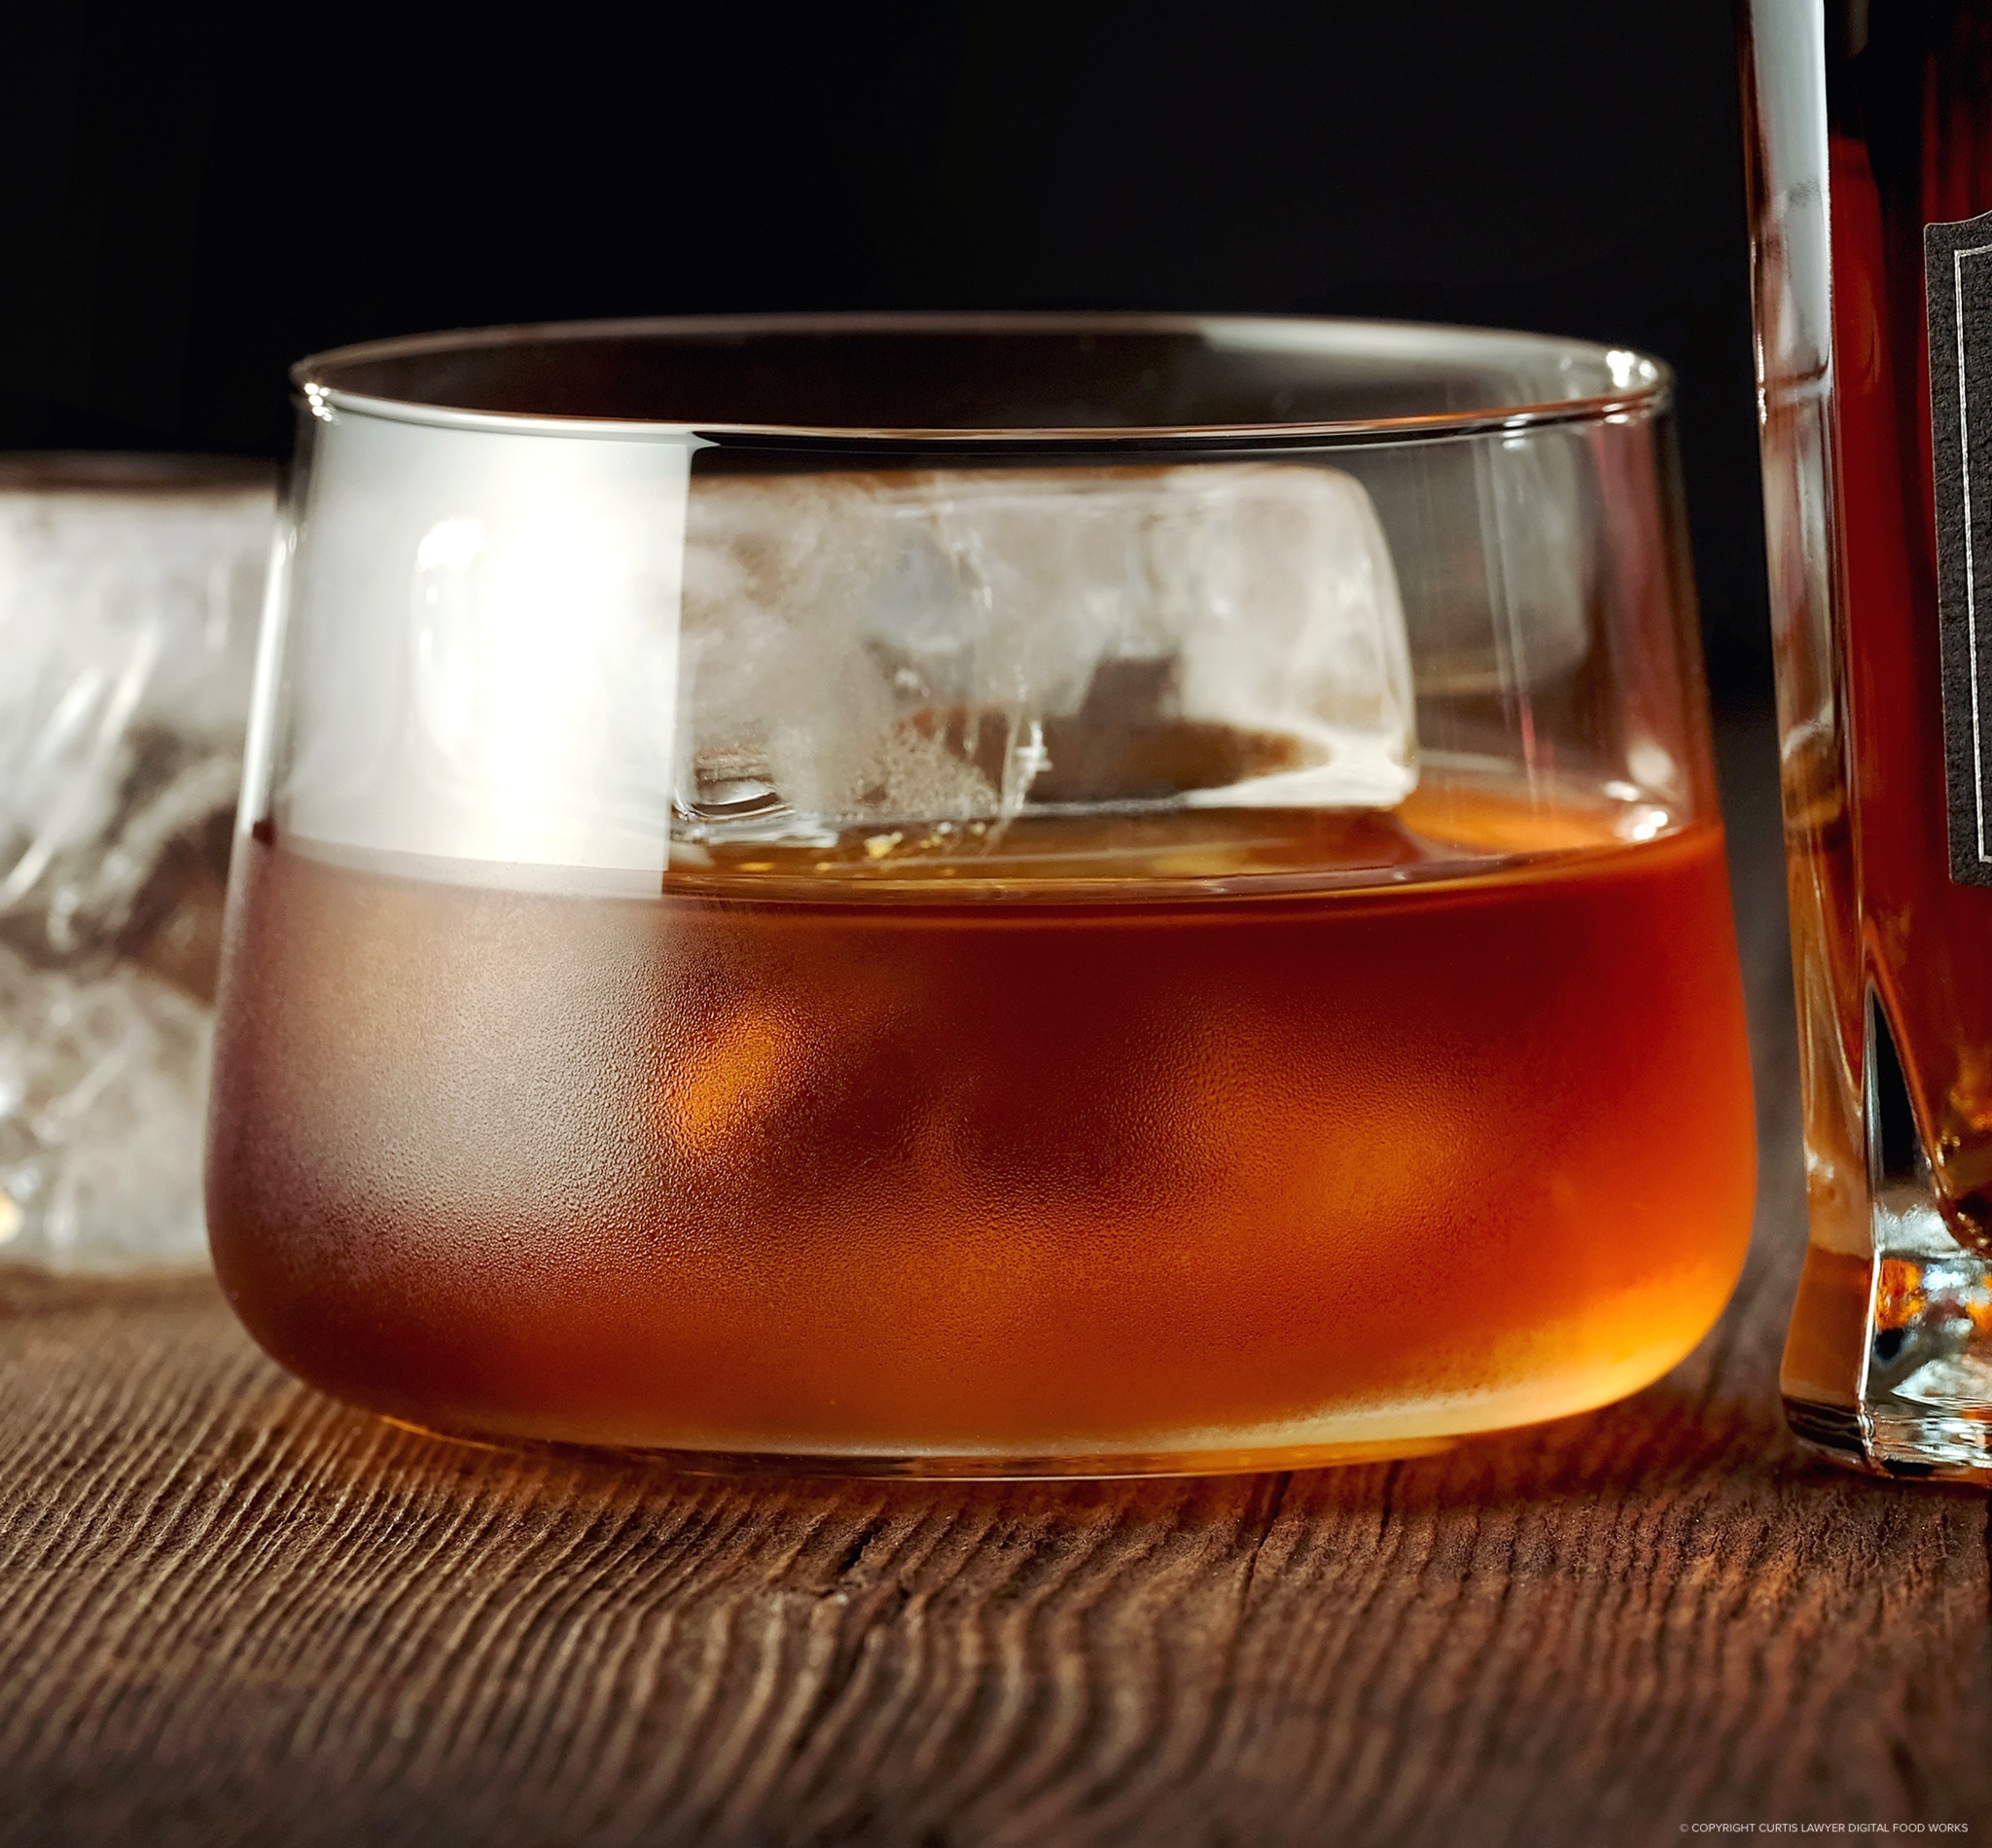
No photo tricks here... that's all just naturally occurring condensation!
Here's another, larger look at the "four flashes" hero shot (the fifth light behind the bottle is not on).
Here's a look at the Jack Daniel's Single Barrel Whiskey bottle and glass, without the fifth light behind the bottle.
I really didn't plan for that fifth LED light to be in the photo behind the bottle, so the "four flash" shot is pretty much what I was thinking about when I started to set the scene up. It's a great photo, but I'm glad I added that fifth LED light at the last minute. I really like the "not even" punchy hot spots that it created in the glass.
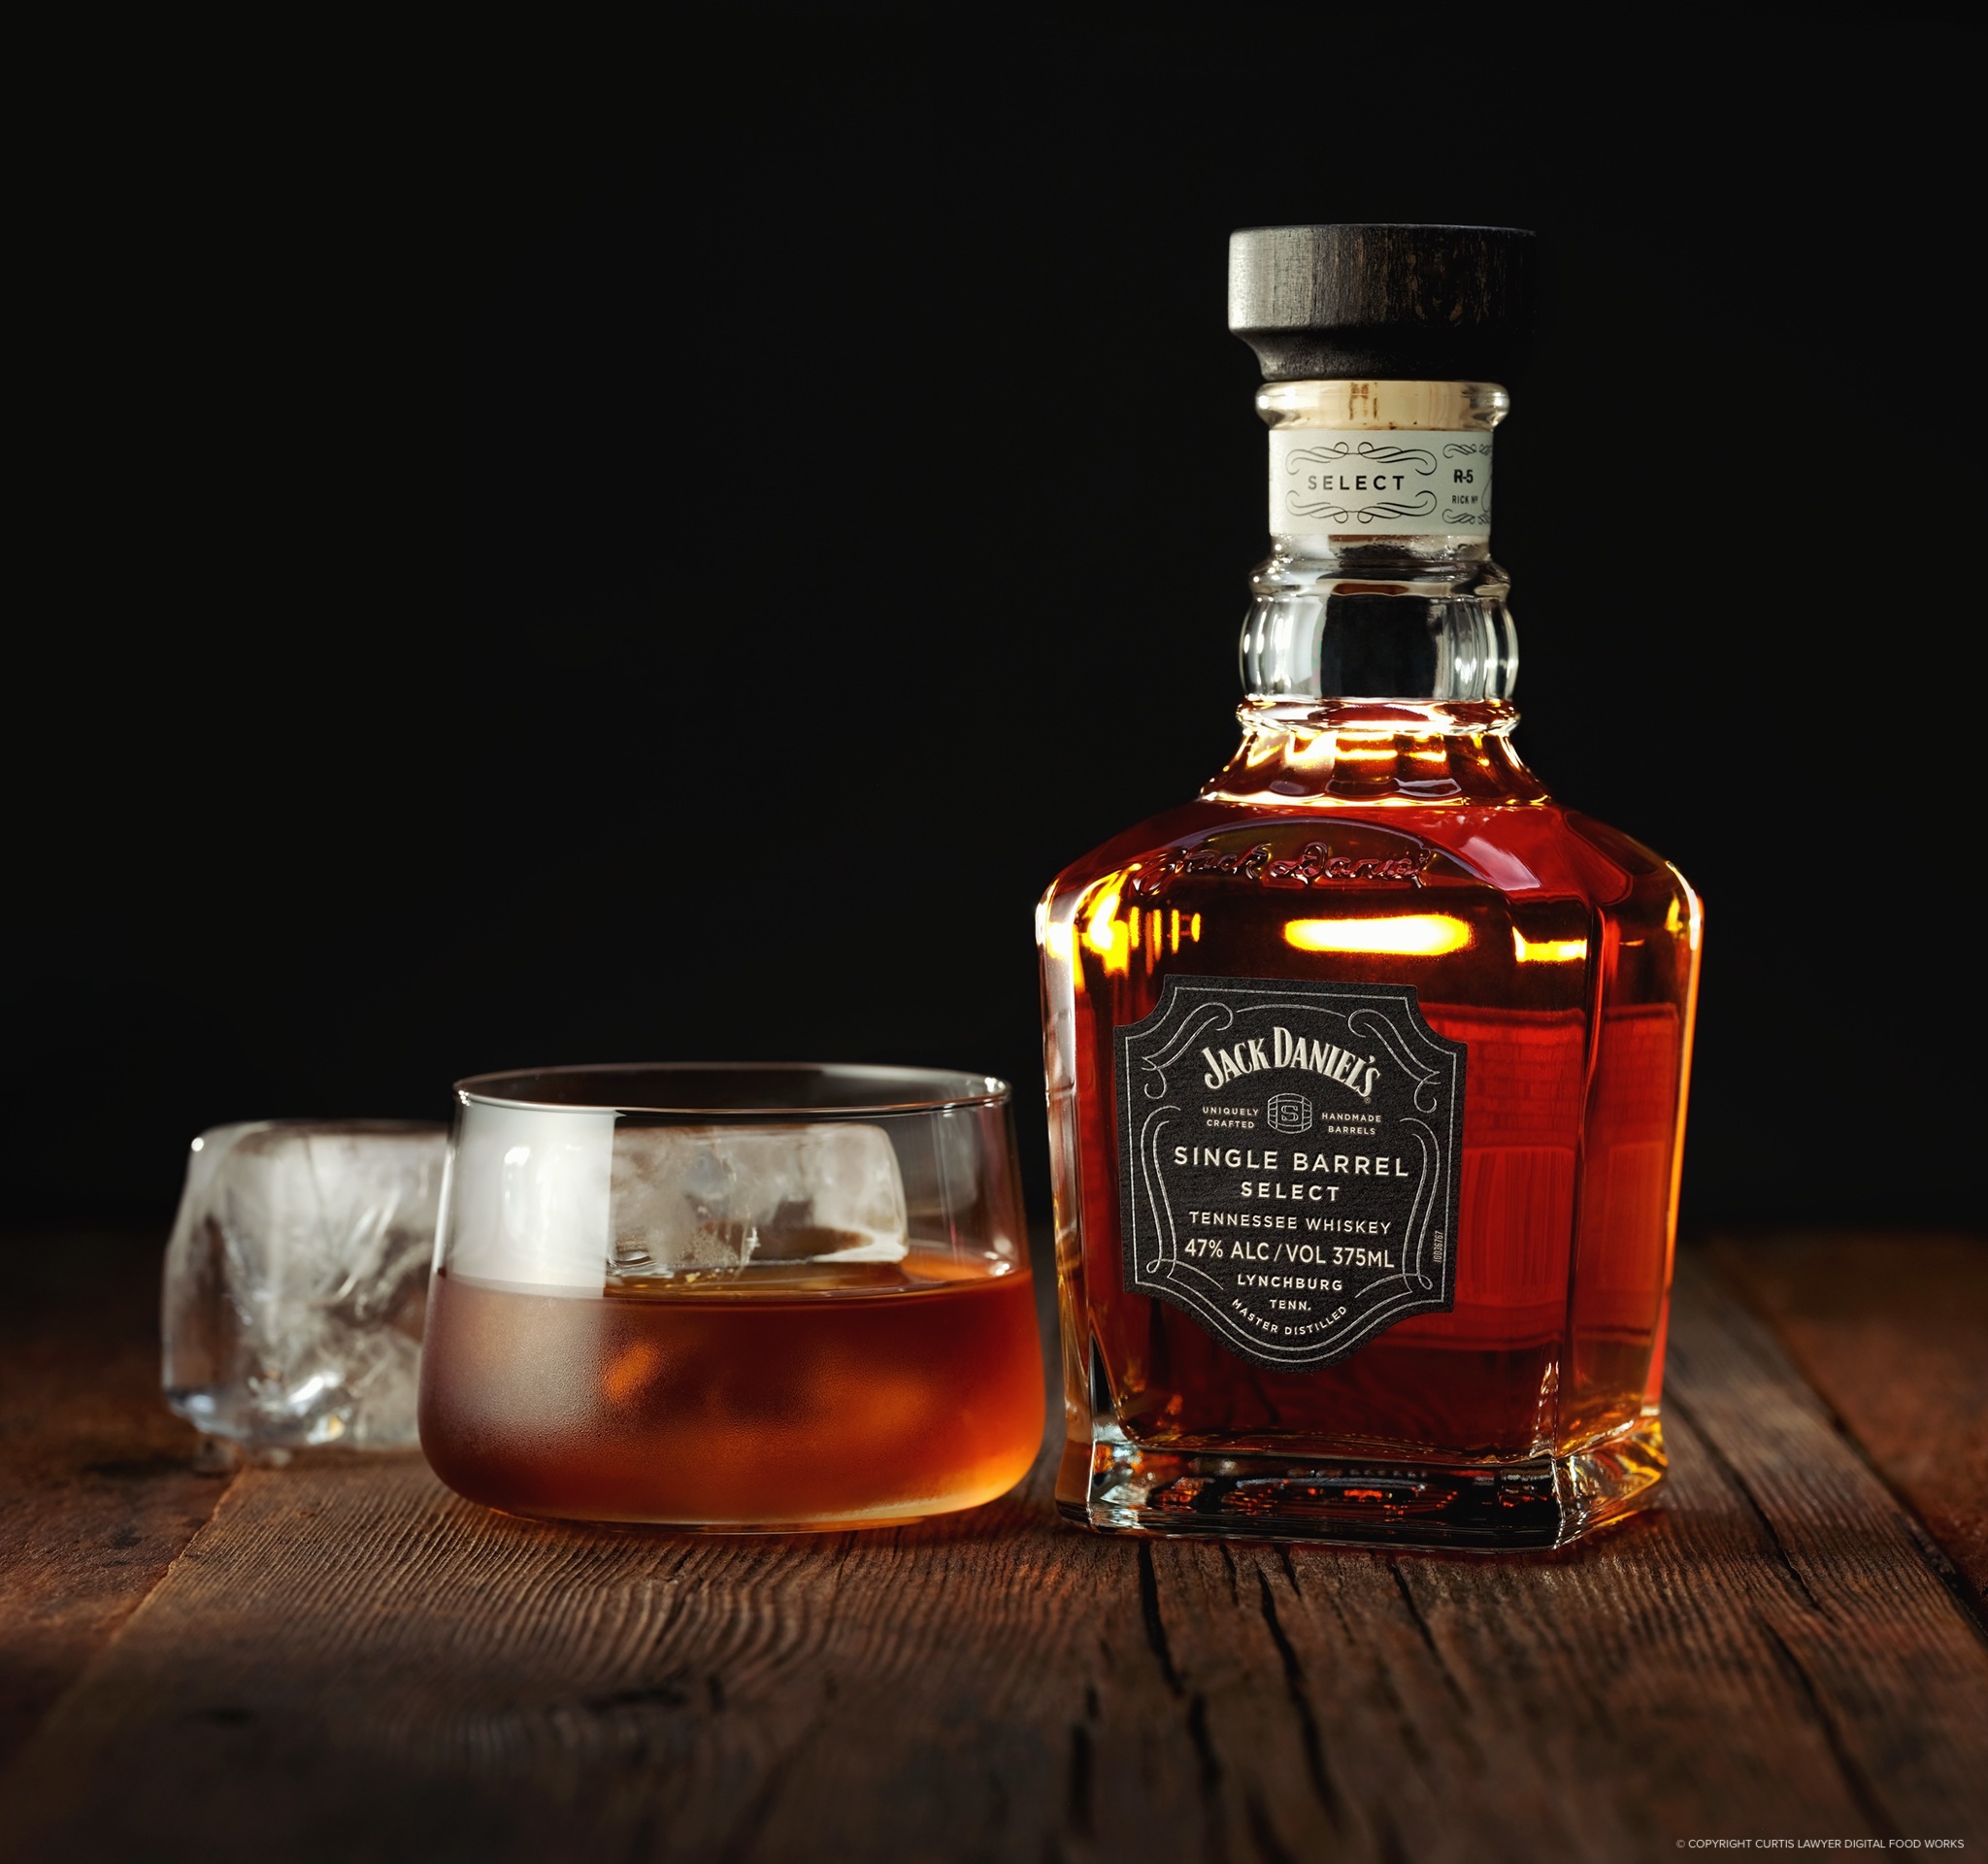
The fifth light (a small LED light) was placed behind the Jack Daniel's bottle to create little more interest in an area on the bottle that was getting a little too dark and murky.
Click Here to check out some of the other Food Photography articles that I've posted here on the Digital Food Works site!